
Introduction
If you’re seeking a delightful dessert that tantalizes your taste buds while evoking childhood memories, look no further than Frozen Yogurt Cereal Milk Cookie Squares. This innovative recipe combines the nostalgic flavors of cereal milk with the comforting texture of cookie squares, creating a sweet treat that is both familiar and refreshingly modern. The idea of cereal milk has taken the culinary world by storm, often celebrated for its creamy, sweet essence reminiscent of breakfast bliss. By incorporating this flavor into a dessert, we elevate the traditional cookie experience to something truly unique.
The appeal of Frozen Yogurt Cereal Milk Cookie Squares lies not only in their delicious taste but also in the dynamic combination of textures. The crispness of cornflakes contrasts beautifully with the creamy yogurt base, while the rich notes of butter and sugar bring indulgence to each bite. These cookie squares are perfect for any occasion—from summer gatherings to cozy evenings at home.
Understanding the Ingredients
To truly appreciate Frozen Yogurt Cereal Milk Cookie Squares, it’s essential to understand the role of each ingredient in this delightful recipe.
The Role of Cornflakes in Cereal Milk
At the heart of this recipe is the beloved cornflake cereal, which serves as the foundational element for the cereal milk. When soaked in whole milk, cornflakes release their natural sweetness and flavor, resulting in a creamy liquid that captures the essence of breakfast. The crispy texture of cornflakes not only enhances the flavor profile but also adds a satisfying crunch to the cookie squares.
Importance of Whole Milk and Yogurt
The combination of whole milk and yogurt is pivotal in achieving the rich creaminess that characterizes the dessert. Whole milk provides a smooth, velvety texture, while yogurt introduces a tangy element that balances the sweetness of the sugar. From a nutritional standpoint, yogurt adds probiotics and protein, making these cookie squares a slightly healthier indulgence compared to traditional options.
The Sweetness Factor: Sugar Types
Sugar plays a critical role in baking, impacting both flavor and texture. In this recipe, a mix of brown sugar and granulated sugar is used to create the perfect balance of sweetness and chewiness. Brown sugar, with its molasses content, contributes moisture and a deeper flavor, while granulated sugar helps achieve a crisp exterior. The combination allows for a cookie square that is both soft and slightly chewy, enhancing the overall experience.
Why Chocolate Chips?
Chocolate chips are an optional yet highly recommended ingredient that adds an extra layer of flavor to the cookie squares. Their melty richness complements the sweet and tangy elements of the yogurt and cereal milk. Choosing high-quality chocolate chips can elevate the dish, providing bursts of chocolatey goodness in every bite. Whether you opt for semi-sweet, dark, or even white chocolate, the choice is yours, and it can significantly impact the final flavor profile.
Preparation Steps Overview
Preparing Frozen Yogurt Cereal Milk Cookie Squares is a straightforward process, making it accessible for bakers of all skill levels. The recipe highlights the simplicity of combining familiar ingredients to create something extraordinary.
One crucial aspect of baking is ensuring that your ingredients are at room temperature. This step is vital for achieving the right texture in your cookie squares. Room temperature butter, for instance, creams more effectively with sugars, resulting in a light and airy dough that leads to perfectly risen cookies.
Each step in the preparation process plays a significant role in ensuring the success of your Frozen Yogurt Cereal Milk Cookie Squares. From making the cereal milk base to preparing the cookie dough, understanding the purpose of each action will help you achieve the best results.
Making the Cereal Milk Base
Creating the cereal milk base is where the magic begins. To start, gather your cornflakes and whole milk. The first step is to combine the two in a mixing bowl, allowing the cornflakes to steep in the milk. This process is essential for extracting the flavor; the cornflakes release their sweetness and essence into the milk, creating a deliciously creamy base.
To let the flavors meld, it’s recommended to let the cornflakes steep for about 30 minutes. This time allows for optimal flavor extraction, ensuring that every bite of your cookie squares is infused with the nostalgic taste of cereal milk.
Once the cornflakes have steeped, the next step is to strain the mixture to achieve a smooth texture. Using a fine mesh strainer, gently press down on the cornflakes to extract as much liquid as possible while leaving behind any solids. The resulting liquid should be a rich, creamy cereal milk that will be mixed with yogurt and flavorings.
Incorporating yogurt into this mixture adds a delightful tanginess that balances the sweetness of the cereal milk. A splash of vanilla extract can be included as well, enhancing the overall flavor profile and adding aromatic notes that elevate the dish.
Preparing the Cookie Dough
With the cereal milk base ready, it’s time to prepare the cookie dough. Start by creaming together softened butter and the sugars. This step is crucial in achieving the desired texture and aeration in your cookie squares. When butter is creamed with sugar, it traps air, creating a light and fluffy mixture that results in cookies that rise beautifully in the oven.
The process involves mixing the butter and sugars until the mixture is pale and fluffy. This usually takes about 2-3 minutes with an electric mixer. Once this step is complete, you can gradually add in the cereal milk mixture, ensuring it is well incorporated. The combination of these ingredients forms the heart of your cookie squares, setting the stage for the delightful dessert to come.
Stay tuned for the next part of this article, where we will dive deeper into the baking process and the final touches that make these Frozen Yogurt Cereal Milk Cookie Squares a standout treat.
{{image_2}}
Incorporating Eggs and Vanilla
The next step in crafting your Frozen Yogurt Cereal Milk Cookie Squares is to incorporate eggs and vanilla into the mixture. Eggs play a vital role in baking, acting as a binding agent that holds the ingredients together while also providing moisture. This combination ensures that your cookie squares have the perfect chewy texture and rich flavor.
When adding eggs to your mixture, it’s essential to allow them to come to room temperature first. This helps them blend more seamlessly into the batter, enhancing the overall consistency. Along with the eggs, add pure vanilla extract, which adds depth and warmth to the flavor profile. The aromatic scent of vanilla will elevate your cookie squares, making them even more inviting.
Mixing Dry Ingredients
With the eggs and vanilla well incorporated, it’s time to mix your dry ingredients. For this recipe, you’ll typically need all-purpose flour, baking soda, and a pinch of salt. Combining these dry ingredients before adding them to the wet mixture is crucial for achieving a well-distributed flavor and texture.
Be cautious not to overmix your dough once the dry ingredients are added. Overmixing can lead to a tough texture in your cookie squares, which is not what we want. Instead, mix just until the flour is incorporated, and the dough starts to come together. This will help maintain that desirable chewy consistency.
Combining Ingredients for the Final Dough
Folding in Cereal Milk
The star of the show in this recipe is undoubtedly the cereal milk, which adds a nostalgic twist reminiscent of childhood breakfasts. Once your dough has come together, gently fold in the cereal milk. Folding is a technique that involves using a spatula to lift and turn the mixture, ensuring that the cereal milk is evenly distributed without deflating the dough.
To achieve this, use a gentle hand and make sure to scoop from the bottom of the bowl to incorporate the cereal milk thoroughly. This technique is essential to preserve the airiness of the dough, which contributes to the light and fluffy texture of your cookie squares.
Adding Optional Chocolate Chips
If you want to elevate the flavor profile even further, consider adding semi-sweet or milk chocolate chips to your dough. The sweetness of the chocolate complements the cereal milk perfectly, enhancing the overall taste experience. Aim for about a cup of chocolate chips, but feel free to adjust the amount based on your preference.
When mixing in the chocolate chips, use the same gentle folding technique to ensure they are evenly distributed throughout the dough without overworking it. This will result in delightful bursts of chocolate in every bite of your cookie squares.
Baking the Cookie Squares
Preheating the Oven: Why It Matters
Before you shape your dough into squares, it’s crucial to preheat your oven to the right temperature, typically around 350°F (175°C). Preheating ensures that your cookie squares bake evenly and develop the perfect texture. An oven that isn’t preheated can lead to uneven cooking, resulting in cookies that are either underbaked or overly dry.
Baking Duration and Texture Indicators
Once your oven is preheated, it’s time to bake your cookie squares. Depending on the thickness of your squares, the baking time can vary, but generally, you should bake them for about 15-20 minutes. Keep a close eye on them as they approach the end of the baking time.
The key indicators that your cookie squares are ready include a lightly golden edge and a soft, slightly underbaked center. The cookies will continue to cook slightly after being removed from the oven due to residual heat, so it’s better to err on the side of underbaking to maintain that chewy texture.
Cooling and Serving Suggestions
The Cooling Process
Once the cookie squares are baked to perfection, it’s essential to allow them to cool properly. Transferring them to a wire rack is crucial as it allows air to circulate around the cookies, preventing them from becoming soggy. Let them cool for at least 10-15 minutes before slicing into squares.
Serving Temperature Options
When it comes to serving, you have a couple of options. These cookie squares are delicious at room temperature, where their flavors are fully pronounced, or you can chill them in the refrigerator for a refreshing treat. Chilling will give the cookie squares a firmer texture, which some may prefer, especially on a warm day.
Benefits of Room Temperature vs. Chilled
Serving your cookie squares at room temperature allows the flavors to shine through, while chilled squares can offer a delightful contrast to the warmth of a summer day. Consider pairing them with a scoop of vanilla ice cream for a truly indulgent dessert experience. The creamy ice cream complements the chewy texture of the cookie squares beautifully.
Storage Recommendations
Best Practices for Storing Cookie Squares
To keep your Frozen Yogurt Cereal Milk Cookie Squares fresh, store them in an airtight container at room temperature. They can last for about 3-5 days, though they are best enjoyed within the first couple of days for optimal freshness. If you want to keep them for a more extended period, consider freezing them.
Discuss Shelf Life and Refrigeration Tips
If you decide to freeze your cookie squares, wrap them individually in plastic wrap and place them in a freezer-safe bag. This method can extend their shelf life for up to three months. When you’re ready to enjoy them, simply remove the desired amount from the freezer and let them thaw at room temperature or microwave them for a few seconds to refresh their texture.
Serving Ideas
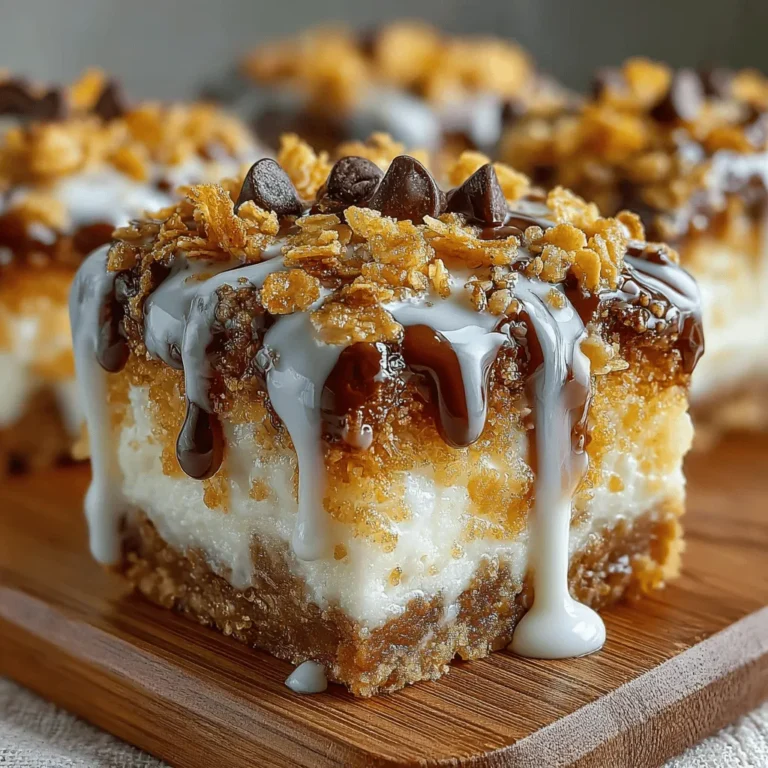
For an extra touch of indulgence, consider serving your cookie squares with drizzled chocolate, whipped cream, or even a sprinkle of your favorite cereal on top. These additions can enhance the visual appeal and add layers of flavor that everyone will love.
Conclusion
In summary, the Frozen Yogurt Cereal Milk Cookie Squares stand out as a unique and delightful treat that combines childhood nostalgia with a modern twist. With their chewy texture, rich flavors, and the added fun of cereal milk, these cookie squares are sure to impress anyone who takes a bite.
Encouraging readers to try this recipe is easy when you emphasize the joy of creating something that not only tastes great but also brings back fond memories of enjoying cereal with milk. So gather your ingredients, follow the steps, and indulge in this delicious recipe for a fun and nostalgic treat that will leave you craving more.
