
Zesty No-Bake Lemon Cheesecake Jars: A Refreshing Treat for Every Occasion
No-bake desserts have surged in popularity in recent years, captivating dessert lovers with their ease of preparation and delightful flavors. Among the myriad of no-bake options, zesty no-bake lemon cheesecake jars stand out as a particularly refreshing treat. Perfect for warm weather or as a light finish to any meal, these individual servings combine the bright, tangy flavor of lemons with the creamy richness of cheesecake, all without the need for an oven. The appeal of this dessert lies not just in its taste but also in its simplicity, making it an ideal choice for both novice cooks and seasoned bakers alike.
The Allure of No-Bake Desserts
One of the primary advantages of no-bake recipes is their straightforwardness. These desserts often require minimal ingredients and can be assembled in a matter of minutes, allowing you to skip the complexities of baking. The absence of an oven means you can avoid the heat and hassle often associated with traditional baking, making no-bake options perfect for hot summer days or impromptu gatherings.
Moreover, no-bake desserts offer remarkable versatility. Whether you’re hosting a festive party, planning a picnic in the park, or simply enjoying a casual gathering with friends, these delightful treats can easily fit the occasion. Their individual jar servings add a touch of elegance and make for easy transport, turning any event into a charming affair.
Citrus-based desserts, like the zesty lemon cheesecake jars, are particularly appealing as they provide a refreshing burst of flavor. The bright and zesty notes of lemon can elevate any dessert, bringing a sense of vibrancy that feels both invigorating and satisfying. As you dive into this recipe, you will discover how each ingredient contributes to the overall experience, enhancing the freshness and deliciousness of the final product.
Ingredients Breakdown
Before embarking on your culinary adventure, it’s essential to familiarize yourself with the main components of this zesty no-bake lemon cheesecake. Each ingredient plays a vital role in crafting a dessert that is not only visually appealing but also bursting with flavor.
1. Graham Cracker Crumbs: The foundation of your cheesecake jars begins with graham cracker crumbs. These provide a crunchy texture that contrasts beautifully with the creamy filling. The subtle sweetness of the graham crackers also complements the tartness of the lemon, creating a harmonious balance in flavor.
2. Unsalted Butter: Unsalted butter is crucial in binding the crust together. It adds richness and helps achieve a smooth, cohesive texture that holds its shape when pressed into the jars. Using unsalted butter allows you to control the overall saltiness of the dessert, ensuring that the zesty flavors shine through.
3. Cream Cheese: The star of the show is undoubtedly the cream cheese. This ingredient brings a luscious creaminess to the cheesecake filling, offering a rich mouthfeel that elevates the entire dessert. To achieve the best results, it’s important to use room temperature cream cheese, as it blends more easily and creates a smoother texture.
4. Powdered Sugar: To sweeten the filling, powdered sugar is the ideal choice. Its fine texture dissolves quickly, ensuring a smooth consistency. The sweetness from the powdered sugar balances the tartness of the lemon, making the cheesecake both delightful and refreshing.
5. Lemon Zest and Juice: The heart and soul of this recipe, lemon zest and juice, deliver that signature zesty flavor. The zest adds aromatic oils that enhance the overall citrus profile, while the juice infuses the filling with a bright acidity that cuts through the richness of the cream cheese.
6. Vanilla Extract: A splash of vanilla extract rounds out the flavor profile, adding warmth and depth to the filling. It complements the lemon without overpowering it, creating a well-balanced taste that makes each spoonful irresistible.
7. Heavy Whipping Cream: To achieve a light and airy filling, heavy whipping cream is folded into the mixture. This ingredient not only adds volume but also contributes to a cloud-like texture that melts in your mouth. Whipping the cream until stiff peaks form is crucial, as it ensures that the cheesecake will hold its shape.
8. Optional Garnishes: For an extra touch of elegance and flavor, consider garnishing your jars with fresh lemon slices and mint leaves. These not only enhance the visual appeal but also add a refreshing note that complements the cheesecake beautifully.
Step-by-Step Instructions
Now that you have a solid understanding of the ingredients, it’s time to dive into the preparation of your zesty no-bake lemon cheesecake jars. Follow these simple steps to create a delicious and visually stunning dessert.
Preparation of the Crust
Start by preparing the crust, as it forms the base of your cheesecake jars. In a mixing bowl, combine the graham cracker crumbs with melted unsalted butter. The goal is to achieve a consistency that resembles wet sand, allowing the mixture to hold together when pressed. It’s important to coat the graham cracker crumbs evenly with butter, as this will ensure a cohesive crust that doesn’t crumble apart.
Once you have your crust mixture ready, begin filling your jars. Use a tablespoon or a small measuring cup to scoop the crust mixture into the bottom of each jar. Press it firmly into the base to create a stable foundation. A flat-bottomed glass or measuring cup can be helpful for this step, as it allows you to compact the mixture evenly. Make sure to create a nice, even layer that will support the luscious cheesecake filling on top.
Making the Cheesecake Filling
With the crust prepared, it’s time to turn your attention to the cheesecake filling. Begin by softening your cream cheese if you haven’t already done so. This step is crucial for achieving a smooth and creamy mixture. You can soften cream cheese by leaving it at room temperature for about 30 minutes or using a microwave for a few seconds—just be careful not to melt it.
In a mixing bowl, combine the softened cream cheese and powdered sugar. Using an electric mixer, blend them together until the mixture is smooth and free of lumps. Gradually incorporate the lemon juice and zest, allowing the flavors to meld together. The key here is to mix the ingredients slowly to avoid overmixing, which can lead to a denser filling.
Once the lemon juice and zest are fully integrated, gently fold in the whipped heavy cream. This step is essential for creating the light, airy texture of the cheesecake. Use a spatula to carefully fold the whipped cream into the cream cheese mixture, being cautious not to deflate the air that you’ve just incorporated.
As you prepare to layer the cheesecake filling into your jars, be sure to taste the mixture. Adjust the sweetness or acidity according to your preference, adding more powdered sugar or lemon juice as needed.
With the crust set and the filling ready, you’re well on your way to creating a delightful dessert that is sure to impress your guests. The next steps will guide you through the final assembly and decoration, ensuring that your zesty no-bake lemon cheesecake jars are both delicious and visually stunning.
Stay tuned for the continuation of this recipe, where we will complete the assembly and explore various serving suggestions to elevate your dessert experience even further.
{{image_2}}
Whipping the Cream
To achieve the perfect texture for your no-bake lemon cheesecake, the first step is whipping the cream. Start by pouring the heavy cream into a large, chilled mixing bowl. Using an electric mixer, begin whipping the cream on medium speed.
Understanding Stiff Peaks
As you whip the cream, you’ll start to see it transform from a liquid state to a fluffy, airy texture. The goal is to reach stiff peaks, which means that when you lift the beaters, the cream holds its shape and stands upright without drooping. Stiff peaks are crucial for the lightness of your cheesecake filling, as they incorporate air into the mixture, giving it a light, airy consistency that contrasts beautifully with the creamy cheese base.
Cautions Against Over-Whipping
However, be cautious not to over-whip the cream. If you continue beating the cream beyond the stiff peak stage, it can turn grainy and eventually separate, leading to a butter-like texture. Over-whipped cream can negatively impact the overall texture of your cheesecake, resulting in a less enjoyable eating experience. Stop whipping as soon as you reach stiff peaks, and set the whipped cream aside while you prepare the rest of the filling.
Folding the Cream
Once your cream is whipped to perfection, it’s time to fold it into the cream cheese mixture. Folding is a gentle technique that helps to maintain the airiness you’ve worked so hard to achieve.
Techniques for Folding
To fold the whipped cream into the cream cheese mixture, use a rubber spatula. Start by adding a small portion of the whipped cream to the cream cheese mixture. This initial addition lightens the dense mixture and makes it easier to incorporate the rest of the whipped cream.
Gently cut through the mixture with your spatula, then scoop from the bottom and fold over the top. Rotate the bowl as you fold, being careful not to deflate the whipped cream. The key is to incorporate the whipped cream gradually, ensuring that the final mixture remains light and fluffy.
Assembling the Jars
Now that your cheesecake filling is ready, it’s time to assemble the jars. This step not only brings your dessert together but also showcases its beautiful layers.
Tips for Smooth Filling Presentation
To achieve a smooth and attractive filling presentation, use a piping bag or a zip-top bag with the corner snipped off. This method allows for precise filling and creates a neat look as you layer the cheesecake mixture into the jars. Start by adding a layer of the cheesecake filling to the bottom of each jar, smoothing it down gently with the back of a spoon or spatula.
Recommendations for Jar Sizes and Types
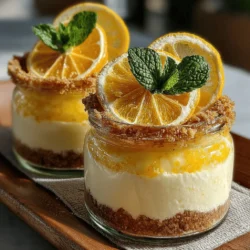
Consider using clear glass jars or cups to highlight the layers of your dessert. Mason jars, small parfait glasses, or even recycled yogurt jars can work wonderfully. The size of the jars can vary according to your preference, but smaller portions are often more visually appealing and practical for serving at gatherings or events.
Chilling Process
Once your jars are filled, they need to chill in the refrigerator to set properly.
Explanation of Chilling Time
The chilling time is essential, as it allows the flavors to meld together and the cheesecake filling to firm up. Ideally, let the jars chill in the refrigerator for at least 4 hours. However, for the best results, consider chilling them overnight. This extended chilling time not only enhances the flavor but also improves the texture, making for a delightful, cohesive dessert.
Presentation Ideas
A beautiful presentation can elevate your no-bake lemon cheesecake jars to a show-stopping dessert.
Suggestions for Garnishing
Consider garnishing your jars with a thin slice of lemon, a sprig of fresh mint, or a dollop of whipped cream on top. These simple additions can add a pop of color and enhance the visual appeal of the jars.
Ideas for Serving Arrangements
For serving, arrange the jars on a decorative platter or cake stand. You might also consider pairing them with fresh berries or a light fruit salad for added freshness. The clear jars showcase the lovely layers and vibrant colors of the lemon cheesecake, making each jar a tempting treat.
Nutritional Benefits of Lemons
Lemons are not only delicious but also pack a nutritional punch.
Overview of Health Benefits
Lemons are rich in vitamin C, an essential nutrient known for its immune-boosting properties. Incorporating lemons into your diet can help support your immune system, keeping you healthy and energetic.
Digestive Benefits
Additionally, lemon juice has been associated with digestive benefits. It can aid in digestion and help alleviate symptoms such as bloating and indigestion. Including lemon in your desserts can be a refreshing way to enjoy these health benefits while satisfying your sweet tooth.
Why This Recipe Stands Out
This no-bake lemon cheesecake recipe offers several advantages over traditional baked cheesecakes.
Comparison with Traditional Baked Cheesecakes
Unlike baked cheesecakes, which require time in the oven and can be finicky to get just right, this no-bake version is straightforward and quick to prepare. You don’t have to worry about water baths or cracking tops; simply mix, layer, and chill.
Unique Aspects of This Dessert
The refreshing citrus flavor of lemon shines through in this dessert, making it perfect for warm-weather gatherings or when you’re craving something light and zesty. Its ease of preparation appeals to novice bakers and seasoned chefs alike, making it a versatile recipe for a wide audience.
Conclusion
In summary, the zesty no-bake lemon cheesecake jars are not only delicious but also incredibly easy to make. With their bright flavors and creamy texture, they provide a refreshing dessert option that can impress guests or serve as a delightful treat for yourself.
I encourage you to try this recipe for a delightful, refreshing dessert experience. With just a few simple steps and ingredients, you can create a visually stunning and satisfying treat that brings joy to any gathering or serves as a personal indulgence. Enjoy your culinary adventure with these delightful jars, and savor every zesty bite!