Refreshing Watermelon Bliss Crisp Recipe
As summer approaches, the vibrant and juicy watermelon takes center stage in a variety of refreshing recipes. Known for its hydrating properties and natural sweetness, watermelon is not just a favorite for picnics and barbecues; it is also the star ingredient in a delightful dessert: Watermelon Bliss Crisp. This unique dish combines the succulent flavors of fresh watermelon with a crunchy topping, making it an ideal treat for warm weather gatherings or a light dessert after a hearty meal.
The Watermelon Bliss Crisp stands out not only for its flavor but also for its health-conscious ingredients. This dessert highlights the natural sweetness of watermelon, along with wholesome components that contribute to a guilt-free indulgence. With each bite, you can enjoy the refreshing taste of summer while nourishing your body with vitamins and minerals.
Understanding the Ingredients
To create a truly memorable Watermelon Bliss Crisp, it’s essential to understand the role of each ingredient. This recipe is designed to be both delicious and nutritious, featuring a combination of fresh fruits and wholesome grains.
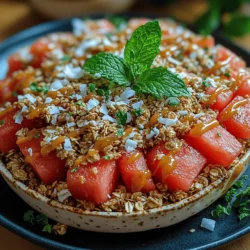
Watermelon: The star of the show, watermelon, is packed with hydration—over 90% of its weight is water. This makes it an incredibly refreshing fruit, perfect for hot days. Beyond hydration, watermelon is rich in vitamins A and C, which support skin health and boost the immune system. Its natural sweetness means you won’t need to add excessive sugar, making it an excellent base for a dessert.
Rolled Oats: Rolled oats provide the essential crisp texture that complements the soft watermelon. They are a great source of dietary fiber, which aids digestion and helps you feel fuller for longer. Additionally, oats are known for their heart health benefits, making them a wholesome addition to any dessert.
Granola: The addition of granola brings a customizable crunch to the Watermelon Bliss Crisp. You can choose from various types of granola, whether it’s nut-based, seed-packed, or simply oat-based. This versatility allows you to tailor the flavor and texture to your liking while adding extra nutrients.
Shredded Coconut: For a tropical twist, shredded coconut enhances the flavor profile of the crisp and adds a chewy texture. Coconut is also high in healthy fats and fiber, making it a satisfying ingredient that pairs beautifully with watermelon.
Almond Butter vs. Peanut Butter: The choice between almond butter and peanut butter can impact both the flavor and nutritional content of your crisp. Almond butter is lower in saturated fat and offers a slightly sweeter taste, while peanut butter provides a heartier, more robust flavor. Both options add creaminess and depth to the dish, so the choice ultimately depends on your personal preference.
Honey vs. Maple Syrup: When sweetening your Watermelon Bliss Crisp, you can opt for either honey or maple syrup. Honey adds a floral sweetness and has antibacterial properties, while maple syrup offers a rich, caramel-like flavor. Both are natural sweeteners that enhance the overall taste without the need for refined sugars.
Ground Cinnamon: A sprinkle of ground cinnamon not only elevates the flavor but also provides numerous health benefits, including anti-inflammatory properties and blood sugar regulation. Its warm, earthy taste complements the freshness of the watermelon beautifully.
Fresh Mint Leaves: Finally, fresh mint leaves add a burst of color and a refreshing taste to the dish. Mint is known for its digestive benefits and its ability to elevate flavors, making it the perfect garnish for your Watermelon Bliss Crisp.
Step-by-Step Guide to Making Watermelon Bliss Crisp
Now that you have a good understanding of the ingredients and their benefits, let’s dive into the preparation of the Watermelon Bliss Crisp. The following steps will guide you through the process of creating this delightful dessert, starting with the preparation of the watermelon.
Preparing the Watermelon:
1. Selecting the Watermelon: Choose a ripe watermelon that feels heavy for its size and has a uniform shape. Look for a creamy yellow spot on the bottom, which indicates ripeness.
2. Cutting the Watermelon: Begin by placing the watermelon on a sturdy cutting board. Use a sharp knife to slice the watermelon in half lengthwise.
3. Creating Bite-Sized Cubes: With the cut side facing down, carefully slice through the flesh of the watermelon to create a grid pattern, making sure not to cut through the rind. Then, use a spoon to scoop out the cubes, ensuring they maintain their shape. Aim for cubes around 1-inch in size for a perfect bite.
4. Draining Excess Juice: Watermelon can be quite juicy, which is great for hydration but not ideal for a crisp texture. Place the cubed watermelon in a colander over a bowl to drain any excess juice while you prepare the crisp base.
Creating the Crisp Base:
1. Combining Dry Ingredients: In a large mixing bowl, combine rolled oats, granola, shredded coconut, and a pinch of ground cinnamon. This mixture forms the foundation of your crisp topping. Ensure the oats and granola are evenly distributed for a consistent texture.
2. Incorporating Nut Butter and Sweetener: In a separate bowl, mix your choice of almond butter or peanut butter with your selected sweetener (honey or maple syrup). Aim for a creamy consistency that will easily blend with the dry ingredients.
3. Mixing for Optimal Texture: Drizzle the nut butter and sweetener mixture over the dry ingredients. Use a spatula or your hands to combine everything thoroughly, ensuring that the oats and granola are well-coated. This will help create that crunchy texture once baked.
4. Optional Add-ins: If you’d like to enhance the texture and nutritional profile of your crisp, consider adding chopped nuts or seeds at this stage. Almonds, walnuts, or chia seeds can provide an extra crunch and boost the health benefits of your dessert.
By following these initial steps, you’ll set the stage for a delightful Watermelon Bliss Crisp that is sure to impress your family and friends. In the next part of this recipe, we will explore how to assemble and bake this refreshing dessert, allowing all the flavors to meld together beautifully.
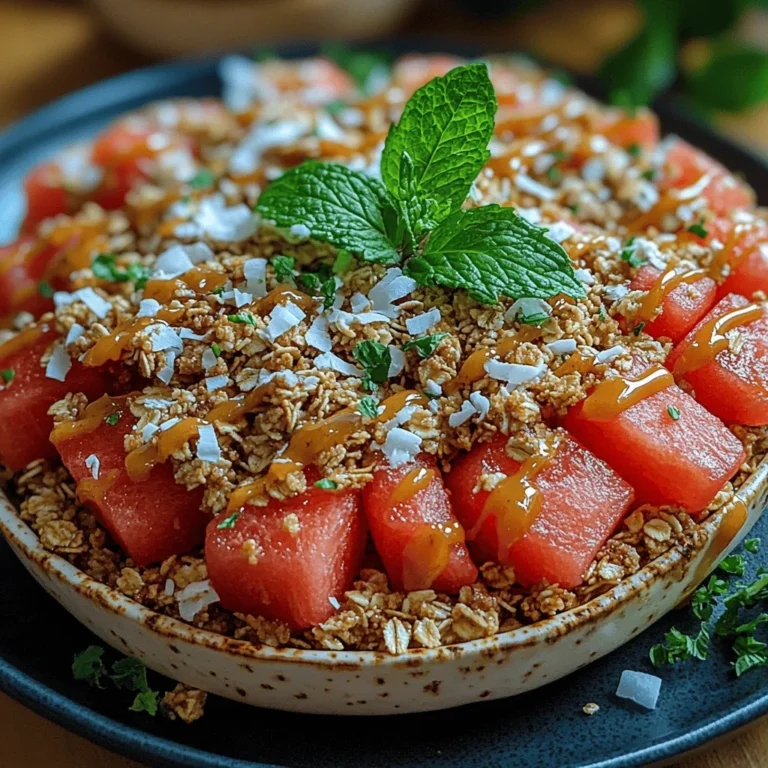
{{image_2}}
Combining Wet Ingredients
To create the perfect base for your Watermelon Bliss Crisp, start by combining the wet ingredients. This step is crucial as it ensures that the flavors meld together beautifully and coat every bite evenly. In a mixing bowl, combine ripe, mashed banana with creamy almond butter and a hint of pure vanilla extract. The banana acts as a natural sweetener and binder, while the almond butter adds richness and depth to the flavor profile.
Importance of Achieving a Smooth Mixture for Even Coating
Achieving a smooth mixture is essential for ensuring even distribution throughout the crisp. Use a fork or a whisk to blend these ingredients thoroughly until you reach a creamy consistency. Avoid any lumps; this will help the wet ingredients coat the dry ingredients evenly, resulting in a crisp that is bursting with flavor in every bite.
Variations Using Different Nut Butters or Sweeteners
Feel free to experiment with different nut butters to tailor the recipe to your taste. For instance, cashew butter or sunbutter can be great alternatives for those with nut allergies. You can also play around with sweeteners; maple syrup or agave nectar can substitute for the banana if you prefer a different flavor or consistency. These variations can add a unique twist to your Watermelon Bliss Crisp and keep it exciting every time you make it.
Incorporating Wet and Dry Ingredients
Once your wet ingredients are perfectly blended, it’s time to incorporate them with the dry ingredients. In a separate bowl, mix together rolled oats, gluten-free granola, and cinnamon. This combination serves as the foundation of your crisp, providing texture and heartiness.
Techniques for Gently Folding to Maintain a Light Texture
When combining the wet and dry mixtures, use a gentle folding technique. This involves using a spatula to lift the mixture from the bottom and fold it over the top, rather than stirring vigorously. This method helps to maintain a light and airy texture, which is essential for a delightful crisp. You want to ensure that every piece of dry ingredient is coated with the wet mixture without over-mixing, which can lead to a dense crisp.
Tips on Ensuring All Dry Ingredients Are Adequately Coated
To ensure that each dry ingredient is well-coated, take your time during this step. Scrape the sides of the bowl to incorporate any dry ingredients that may have clung to the edges. It’s important that every oat and granola piece is enveloped in the wet mixture, as this will contribute to the overall flavor and texture of the final dish.
Layering the Crisp
Layering is not just about taste; it’s also about presentation. When assembling your Watermelon Bliss Crisp, start with a layer of watermelon slices at the bottom of your baking dish. The juicy watermelon not only adds moisture but also a refreshing sweetness.
Importance of Presentation and Layering for Visual Appeal
Next, sprinkle half of the oat mixture over the watermelon. This layering creates a beautiful contrast of colors and textures, enhancing the visual appeal of the dish. Continue layering with more watermelon and top with the remaining oat mixture. The final layer should be the crisp topping, which should be evenly spread to ensure consistent baking and crunchiness.
Recommendations for Baking Dish Sizes and Material Types
For this recipe, a 9×9-inch square baking dish works perfectly. If you prefer a thinner crisp, you could use a larger baking dish, such as a 9×13-inch. Consider using glass or ceramic dishes for even heat distribution, which helps in achieving that perfect golden-brown crisp on top.
Chilling for Flavor Fusion
After layering your Watermelon Bliss Crisp, it’s essential to let it chill before baking. Chilling allows the flavors to meld together, resulting in a richer taste. It also helps the oats absorb some of the moisture from the watermelon, enhancing the overall texture.
Explanation of How Chilling Affects Flavor and Texture
Chilling is not just about cooling down the dish; it significantly enhances the flavor profile. As the ingredients sit together, the natural sugars from the watermelon infuse into the oats and nut butter, creating a harmonious blend of flavors. The result is a crisp that is both refreshing and satisfying.
Ideal Chilling Times for Best Results
For optimal results, aim for at least 30 minutes of chilling in the refrigerator. If time allows, you can chill it for up to 2 hours. This extra time will elevate the flavors and ensure a delightful eating experience.
Serving Suggestions
When it comes to serving your Watermelon Bliss Crisp, there are many creative ideas to enhance its presentation and taste. You can serve it warm from the oven or cold, depending on your preference.
Creative Ideas for Presenting the Watermelon Bliss Crisp
Consider garnishing the dish with fresh mint leaves for a pop of color and freshness. A dollop of coconut whipped cream or a scoop of dairy-free ice cream on top can elevate the dish to a new level, making it a perfect dessert for summer gatherings.
Pairing Suggestions with Beverages or Other Dishes
Pair the Watermelon Bliss Crisp with a refreshing glass of iced tea or lemonade for a complete summer experience. For a more filling meal, consider serving it alongside a light salad or yogurt for breakfast or brunch.
Nutritional Information and Health Benefits
Understanding the nutritional benefits of your Watermelon Bliss Crisp can enhance your enjoyment of this delightful dessert. Each serving contains approximately 200 calories, 8 grams of fat, 15 grams of carbohydrates, and 3 grams of protein.
Breakdown of Calories, Fats, Sugars, and Nutrients per Serving
– Calories: 200
– Total Fat: 8g
– Saturated Fat: 1g
– Total Carbohydrates: 15g
– Sugars: 5g
– Protein: 3g
This recipe is rich in vitamins and minerals, thanks to the fresh watermelon, oats, and nut butter. Watermelon is an excellent source of hydration, while oats provide sustained energy and fiber.
Discuss the Health Advantages of Consuming a Dessert Made from Fresh Fruits, Whole Grains, and Healthy Fats
The Watermelon Bliss Crisp combines fresh fruits, whole grains, and healthy fats, making it a nutritious choice for a dessert. The fiber from the oats aids in digestion, while the natural sugars from the watermelon offer a sweet taste without the need for excessive added sugars. This dessert is not only delicious but also aligns with healthy eating habits.
Highlight the Recipe’s Suitability for Various Dietary Preferences
This Watermelon Bliss Crisp is versatile and can cater to various dietary preferences. It can easily be made vegan by using plant-based ingredients, and it can be gluten-free if you opt for gluten-free granola. This adaptability makes it a fantastic choice for gatherings, ensuring everyone can enjoy a slice of this delightful dish.
Conclusion
The Watermelon Bliss Crisp is a refreshing and healthy dessert that encapsulates the essence of summer. With its vibrant flavors, satisfying textures, and nutritional benefits, it is perfect for summer gatherings or everyday enjoyment. The simplicity of the recipe allows for creativity, encouraging you to customize it with your favorite ingredients while maintaining its core essence.
Embrace the joy of cooking and share this delightful crisp with family and friends. Whether served warm or chilled, the Watermelon Bliss Crisp is sure to be a hit at any occasion, inviting everyone to savor the taste of summer in every bite.