
Introduction
As the sun blazes down and the temperatures soar, finding ways to stay cool becomes a top priority. What better way to refresh yourself than with a homemade frozen treat? Our Frozen Vanilla Berry Swirl Pops are an excellent choice for both kids and adults seeking a deliciously satisfying way to beat the heat. These popsicles bring together a delightful blend of creamy vanilla and vibrant mixed berries, creating a treat that not only satisfies your sweet cravings but also packs a nutritional punch.
Made primarily with Greek yogurt and an assortment of berries, these pops offer a wholesome alternative to store-bought ice creams and sugary snacks. The combination of tangy yogurt, sweet berries, and a touch of natural sweetener makes for a refreshing indulgence that you can feel good about serving your family. In this article, we will walk you through the process of making these delightful pops, ensuring that you can create a delicious treat that everyone will love.
Understanding the Ingredients
To create the perfect Frozen Vanilla Berry Swirl Pops, it’s essential to understand the role of each ingredient in the recipe. Knowing how these components work together will not only enhance your culinary skills but also allow you to customize the pops to suit your taste preferences. Let’s delve into the key ingredients that make these pops so irresistible.
Exploring the Base Ingredients
Greek Yogurt:
At the heart of our pops is Greek yogurt, which serves as the creamy base. Its thick texture provides a satisfying mouthfeel that mimics traditional ice cream while adding a wealth of nutrition. Greek yogurt is known for its high protein content, which helps keep you feeling full longer, making these pops a great snack option. Additionally, the probiotics found in Greek yogurt support gut health, adding an extra layer of wellness to your treat.
Honey or Maple Syrup:
To sweeten our creamy base, we turn to natural sweeteners like honey or maple syrup. These alternatives to refined sugar not only provide a touch of sweetness but also bring their unique flavors to the mix. Honey offers a floral note, while maple syrup adds a hint of caramel richness. The beauty of this recipe is that you can adjust the sweetness level to suit your personal preference, ensuring your pops are just the right amount of sweet.
Vanilla Extract:
A splash of quality vanilla extract is essential for depth of flavor. Vanilla adds warmth and richness, enhancing the overall taste profile of your pops. When selecting vanilla extract, opt for pure extract rather than imitation for the best flavor. This simple addition elevates the entire recipe, transforming it from ordinary to extraordinary.
Mixed Berries:
Berries are the stars of this recipe, both for their flavor and their nutritional benefits. Rich in antioxidants, vitamins, and fiber, mixed berries like strawberries, blueberries, and raspberries not only add vibrant color but also contribute to a healthy diet. You can use fresh seasonal berries for the best flavor, but frozen berries work just as well and can be a more convenient option, especially when certain fruits are out of season. Feel free to experiment with different combinations of berries to find your perfect blend.
Lemon Juice:
A splash of lemon juice brightens the flavor profile of the pops and helps balance the natural sweetness of the yogurt and berries. The acidity from the lemon cuts through the creaminess, resulting in a refreshing taste that keeps each bite interesting. It’s a small addition that makes a significant impact on the overall flavor.
Salt:
While it may seem counterintuitive to add salt to a sweet treat, a pinch of salt actually enhances the flavors of all the ingredients. Salt helps to balance sweetness and can elevate the overall taste, making the flavors pop. Just a small amount can make a big difference in the final product.
Step-by-Step Preparation
Now that we understand the ingredients that go into our Frozen Vanilla Berry Swirl Pops, it’s time to dive into the preparation process. Follow these steps to create your own delicious pops at home.
Preparing the Berry Mixture
To start, we’ll focus on the berry mixture, which will provide the vibrant swirl in our pops. Here’s how to prepare it:
1. Choosing Your Berries:
Decide on the types of berries you’d like to use. A classic combination is strawberries and blueberries, but feel free to mix in raspberries or blackberries for added depth of flavor. If using frozen berries, ensure they are thawed slightly for easier blending.
2. Blending the Berries:
Place your chosen berries in a blender or food processor. Blend until you achieve your desired texture. If you prefer a smoother consistency, blend until completely pureed. For a chunkier texture that provides delightful bursts of fruit in each pop, pulse the berries just a few times until they are broken down but still have some small pieces.
3. Adjusting Sweetness:
Taste the berry mixture and adjust the sweetness if necessary. If your berries are particularly tart, you may want to add a drizzle of honey or maple syrup to enhance the flavor. Blend once more to incorporate any additional sweetener.
4. Set Aside:
Once your berry mixture is ready, set it aside while you prepare the yogurt base. This will allow you to layer the mixtures effectively later on.
Making the Yogurt Base
With the berry mixture completed, it’s time to create the creamy yogurt base:
1. Mixing the Yogurt:
In a mixing bowl, combine Greek yogurt with honey or maple syrup, vanilla extract, lemon juice, and a pinch of salt. Stir until all ingredients are well incorporated. The yogurt should be smooth and creamy, with a balanced sweetness.
2. Experimenting with Flavor:
If you want to experiment with flavors, consider adding a dash of cinnamon or a splash of almond extract for a unique twist. Mix these extras into the yogurt base until evenly distributed.
3. Achieving the Right Consistency:
If the yogurt seems too thick, you can thin it slightly with a bit of milk or water. The goal is a creamy consistency that can be easily layered but will still hold its shape when frozen.
Layering the Pops
Now comes the fun part: layering the yogurt and berry mixtures in your popsicle molds. This step is crucial for achieving both aesthetics and flavor distribution:
1. Visualizing the Layers:
Start by spooning a layer of yogurt mixture into the bottom of your popsicle molds, filling them about one-third of the way. This creamy layer serves as the foundation for the pops.
2. Adding the Berry Mixture:
Next, add a layer of the berry mixture on top of the yogurt. To create a beautiful swirl effect, use a skewer or a spoon to gently swirl the two mixtures together, being careful not to overmix. You want to create a marbled effect that showcases both the yogurt and berry colors.
3. Completing the Layers:
Repeat the layering process until the molds are full, finishing with a final layer of yogurt on top. This ensures that the berry mixture is well-distributed throughout the pop while the top remains creamy.
4. Filling Molds Efficiently:
To fill your molds with minimal mess, use a funnel or a piping bag to transfer the mixtures. This helps control the flow and prevents spills.
By following these initial steps, you’re well on your way to creating delicious Frozen Vanilla Berry Swirl Pops. Stay tuned for the next part, where we’ll discuss freezing techniques, storage, and some creative ways to enjoy these delightful treats!
{{image_2}}
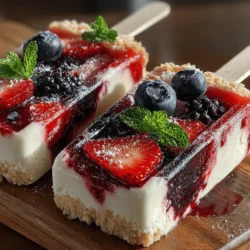
Creating delightful frozen treats at home is not only a fun activity but also a way to explore healthier alternatives to store-bought options. In this section, we’ll delve into the process of swirling the layers of your Frozen Vanilla Berry Swirl Pops, ensuring they look as good as they taste. We’ll also cover the freezing process, techniques for unmolding, serving suggestions, and the nutritional benefits of these delicious pops.
Swirling the Layers
Creating the marbled effect in your Frozen Vanilla Berry Swirl Pops is where the artistry lies. The combination of creamy vanilla yogurt and vibrant berry puree not only makes for an appealing visual but also enhances the flavor profile with each bite.
Step-by-Step Guide to Creating the Marbled Effect
1. Layer the Ingredients: Begin by spooning a layer of the vanilla yogurt mixture into your popsicle molds, filling them about a third of the way. Next, add a layer of the berry puree on top. Repeat this layering process until the molds are nearly full, leaving a little space at the top for expansion during freezing.
2. Swirl Carefully: To create the swirl, use a skewer or a thin knife to gently stir through the layers. Insert the skewer vertically and make a few gentle, circular motions to incorporate the berry puree into the vanilla yogurt without completely mixing them together. The goal is to create beautiful swirls; overmixing will lead to a less visually appealing pop.
3. Visual and Taste Appeal: The science behind the swirling effect lies in the contrast of flavors and textures. The creamy vanilla yogurt balances the tartness of the berries, creating a harmonious blend that excites the palate. The visual appeal of the vibrant colors also enhances the overall dessert experience, making it more enticing.
Freezing Process
Once your layers are swirled to perfection, it’s time to freeze the pops. Proper freezing is crucial to ensure your pops are firm and easy to enjoy.
Inserting Sticks and Freezing
1. Inserting the Sticks: To ensure that the popsicle sticks remain centered, insert them into the molds after about 30 minutes of freezing. This allows the layers to set slightly, providing a stable base for the sticks. Insert each stick into the center of the layers, pushing it down until it reaches the bottom of the mold.
2. Ideal Freezing Time: For the best results, freeze the pops for at least 4-6 hours or until they are completely solid. To check if they are fully set, gently press on the pops; they should feel firm and not soft to the touch.
Unmolding and Serving
Unmolding your Frozen Vanilla Berry Swirl Pops can be a delicate process, but with the right techniques, you can achieve perfect pops every time.
Techniques for Unmolding
1. Warm Water Method: To unmold the pops, dip the mold in warm water for about 10-15 seconds. The warmth will help loosen the pops from the sides. Be careful not to submerge the mold too deeply, as you want to avoid water seeping into the pops.
2. Gentle Pulling: After the warm water dip, gently pull on the popsicle sticks. If the pops do not easily release, you can dip the mold back into the warm water for a few more seconds. This method minimizes the risk of damaging the pops while ensuring a smooth release.
3. Troubleshooting Common Issues: If your pops are sticking, it may be due to overfilling the molds or not allowing enough time for them to set. To avoid this in the future, double-check your filling levels and freezing times.
Presentation Ideas
The way you present your Frozen Vanilla Berry Swirl Pops can elevate them from simple treats to stunning desserts.
– Garnishing: Consider garnishing your pops with fresh mint leaves for a pop of color and an added layer of freshness. You can also drizzle a bit of additional berry puree over the top for a striking presentation.
– Serving Suggestions: Serve your pops on a decorative platter, perhaps alongside other summer treats like fruit skewers or a light fruit salad. They pair beautifully with refreshing beverages such as iced tea or lemonade, making them perfect for summer gatherings.
Nutritional Benefits
One of the best parts about making your own Frozen Vanilla Berry Swirl Pops is the ability to control the ingredients. These pops not only satisfy your sweet tooth but also offer several health benefits.
Highlighting the Health Aspects
1. Greek Yogurt Benefits: Greek yogurt is rich in protein and probiotics, which promote gut health. It also provides a creamy texture without the need for added sugars, making it a healthier base for your pops.
2. Berry Power: Berries are packed with antioxidants, vitamins, and minerals. They help combat oxidative stress and inflammation, boosting your overall health. The natural sweetness of berries also allows you to use less added sugar in your recipes.
3. Comparison to Store-Bought Options: When compared to store-bought pops, these homemade treats shine. Most commercial frozen pops are loaded with artificial ingredients, preservatives, and added sugars. By making your own, you can indulge guilt-free, knowing exactly what goes into your pops.
Conclusion
Frozen Vanilla Berry Swirl Pops are not just a delicious treat; they are a celebration of summer flavors and a fantastic way to enjoy nutritious ingredients. With their creamy texture and vibrant berry taste, these pops are bound to become a staple in your summer dessert repertoire.
Whether you serve them at a family gathering or savor them as a personal treat, these pops offer the perfect balance of indulgence and health. Embrace the joy of making your own frozen desserts and relish the delightful results. Enjoy the refreshing flavors, and don’t hesitate to experiment with different fruit combinations or yogurt bases. Your taste buds will thank you!