
Cheddar & Chive Biscuit Bliss: A Delightful Recipe for Any Occasion
Introduction
Welcome to the world of Cheddar & Chive Biscuit Bliss, a recipe that promises to be a delightful addition to your culinary repertoire. These biscuits are more than just a simple baked good; they are a harmonious blend of sharp cheddar cheese and fresh chives, creating a flavor profile that is both rich and refreshing. Whether you’re looking for a quick breakfast option, a comforting side to accompany your favorite soup, or a savory snack for an afternoon gathering, these biscuits are incredibly versatile and sure to impress.
Cheddar & Chive Biscuit Bliss is an embodiment of comfort food, yet it manages to elevate any meal with its gourmet touch. The sharpness of the cheddar cheese complements the mild onion-like flavor of chives, making each bite a taste sensation. With minimal ingredients and straightforward instructions, this recipe is designed to be both accessible for beginners and rewarding for seasoned bakers. Let’s dive into the details of this scrumptious recipe, exploring the ingredients and the essential steps to achieve biscuit perfection.
Understanding the Ingredients
Before we embark on the baking journey, it’s essential to understand the key components that make up the Cheddar & Chive Biscuits. Each ingredient plays a vital role in creating the perfect texture and flavor.
– All-Purpose Flour: This is the foundation of our biscuit recipe. All-purpose flour provides the necessary structure and texture, allowing the biscuits to rise and hold their shape while still remaining tender.
– Baking Powder: As a leavening agent, baking powder is crucial for achieving light and fluffy biscuits. It reacts with the moisture and heat in the oven to produce carbon dioxide gas, which helps the biscuits rise beautifully.
– Salt and Black Pepper: These seasoning essentials enhance the overall flavor profile of the biscuits. Salt brings out the richness of the cheddar, while black pepper adds a subtle warmth that rounds out the taste.
– Unsalted Butter: The key to achieving flaky layers in your biscuits is cold unsalted butter. When incorporated into the flour mixture, it creates pockets of steam during baking, resulting in a light and airy texture.
– Sharp Cheddar Cheese: The star of the show, sharp cheddar cheese, adds a robust and tangy flavor that is simply irresistible. Choosing a high-quality cheese will significantly elevate the taste of your biscuits.
– Fresh Chives: These delicate green herbs contribute a fresh, herbaceous note that complements the richness of the cheese. Their mild flavor adds depth without overpowering the other ingredients.
– Buttermilk: This ingredient not only moistens the dough but also introduces a slight tang that enhances the overall flavor. The acidity in buttermilk also helps to tenderize the biscuits.
Step-by-Step Instructions
Now that we’ve examined the key ingredients, it’s time to roll up our sleeves and start baking. Follow these step-by-step instructions to ensure your Cheddar & Chive Biscuits turn out perfectly every time.
Prepping for Success
The first step in any successful baking endeavor is preparation. Begin by preheating your oven to 400°F (200°C). This ensures that your biscuits will bake evenly and rise to their full potential. While the oven heats up, line a baking sheet with parchment paper to prevent sticking and promote even browning.
Combine Dry Ingredients
In a large mixing bowl, sift together the all-purpose flour, baking powder, salt, and black pepper. Sifting the dry ingredients is essential, as it helps to eliminate any lumps and ensures an even distribution of the baking powder throughout the flour. This step is crucial for achieving the light and fluffy texture that is characteristic of great biscuits.
Cutting in the Butter
Next, it’s time to incorporate the cold unsalted butter into the flour mixture. Cut the butter into small cubes and add it to the bowl. Using a pastry cutter, two forks, or your fingertips, gently work the butter into the flour until the mixture resembles coarse crumbs. Be careful not to overwork the dough; the goal is to keep small pieces of butter intact, as these will create flakiness in the final product.
Once the butter is well incorporated, it’s time to add the star ingredients: the sharp cheddar cheese and fresh chives. Gently fold these into the mixture using a spatula or wooden spoon, ensuring they are evenly distributed throughout the dough.
As you can see, creating Cheddar & Chive Biscuit Bliss is an engaging process that combines simple techniques with quality ingredients. By understanding the role of each component and following these initial steps, you’ll set the stage for baking biscuits that are not only delicious but also a joy to make. Stay tuned as we continue to explore the remaining steps of this delectable recipe, guiding you on your journey to biscuit perfection.
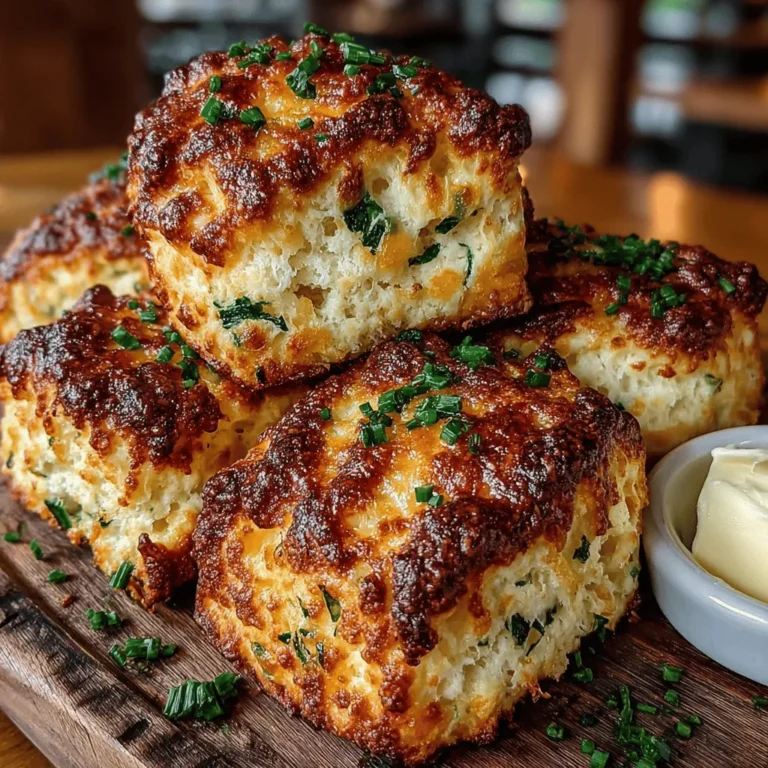
{{image_2}}
Creating the Biscuit Dough
Incorporating Cheese and Chives
The key to achieving a delightful Cheddar & Chive Biscuit lies in the proper incorporation of these flavorful ingredients into the dough. Start by grating your cheese; the finer the cheese is grated, the easier it will blend into the dough, creating a uniform flavor throughout.
Chop the chives as finely as possible, as larger pieces can create uneven distribution in the dough. For best results, add the grated cheese and chopped chives to the dry ingredients (flour, baking powder, salt) before adding any wet components. This method allows the flour to coat the cheese and chives, preventing them from clumping together and ensuring a consistent taste in every bite. Gently toss the dry ingredients with your hands or a fork until the cheese and chives are well-distributed.
Mixing in Buttermilk
When it comes to mixing in the buttermilk, the goal is to create a cohesive dough without overworking it. Pour the buttermilk into the dry mixture gradually, stirring gently with a wooden spoon or spatula. It’s essential to combine the ingredients just until the dough comes together—this means no dry flour should be visible, but the mixture should still be somewhat shaggy. Over-mixing can lead to tough biscuits, so be mindful of your mixing technique.
Once the dough is formed, turn it out onto a lightly floured surface. You may notice some sticky bits; this is normal. Use your hands to gently knead the dough a couple of times, just enough to bring it together into a cohesive mass.
Shaping and Baking
Shaping the Biscuits
To shape your biscuits, first flatten the dough into a rectangle about 1 inch thick. The key to achieving a good rise during baking is to avoid twisting the cutter when you cut out the biscuits. Instead, press straight down and pull up to create clean edges. This helps the biscuits rise evenly and achieve that desired flaky texture.
Once you have cut out your biscuits, gather any scraps of dough, knead them gently, and continue cutting until all the dough is used. Aim for uniform sizes to ensure that all biscuits bake at the same rate.
Egg Wash for a Golden Finish
An egg wash is a simple yet effective way to give your biscuits a beautiful golden-brown finish. To prepare the egg wash, beat one egg in a small bowl and add a tablespoon of water or milk; this will help to thin the egg slightly.
Using a pastry brush, gently apply the egg wash over the top of each biscuit. This step not only enhances the color but also adds a slight sheen, making your biscuits visually appealing as they bake. Be careful not to let the egg wash drip down the sides of the biscuits, as this can create a less attractive finish.
Baking to Perfection
Preheat your oven to 425°F (220°C) and line a baking sheet with parchment paper. Arrange your biscuits on the baking sheet, leaving some space between them for expansion. Bake the biscuits in the preheated oven for approximately 12-15 minutes or until they are golden brown and have risen beautifully.
To check for doneness, you can gently tap the top of a biscuit; it should sound hollow. Additionally, the bottom of the biscuit should have a nice golden color. Once baked, remove them from the oven and allow them to cool on a wire rack for a few minutes before serving.
Cooling and Serving Suggestions
Serving Warm
There’s nothing quite like the aroma of freshly baked Cheddar & Chive Biscuits wafting through your kitchen. For the best experience, serve them warm straight from the oven. They are perfect for breakfast, brunch, or as a side dish for soups and salads.
To keep them warm until serving, you can place them in a breadbasket lined with a clean kitchen towel. This will help retain their warmth and keep them soft.
Garnishing for Appeal
Enhance the visual presentation of your biscuits with simple garnishes. A sprinkle of extra chopped chives or a dash of freshly cracked black pepper can elevate the look of your dish. For a touch of elegance, consider adding a small dollop of whipped cream cheese or herb-infused butter on the side. This not only adds flavor but also a delightful contrast that guests will appreciate.
Nutritional Information
Understanding the Benefits
When it comes to enjoying Cheddar & Chive Biscuits, it’s important to consider their nutritional content. Each biscuit contains approximately 150 calories, making them a relatively indulgent yet satisfying treat. Here’s a brief overview of the nutritional breakdown per biscuit:
– Calories: 150
– Total Fat: 8g
– Saturated Fat: 4g
– Cholesterol: 40mg
– Sodium: 300mg
– Total Carbohydrates: 15g
– Dietary Fiber: 0.5g
– Sugars: 0g
– Protein: 4g
Ingredient Benefits
– Cheddar Cheese: Rich in calcium and protein, cheddar cheese adds not only flavor but also nutritional value to the biscuits.
– Chives: These flavorful herbs are not just for garnish; they contain vitamins A and C, and they have antioxidant properties. Their mild onion flavor enhances the overall taste of the biscuits without overpowering the dish.
– Buttermilk: This ingredient not only contributes to the biscuits’ tender texture but is also a good source of probiotics, which are beneficial for gut health.
Conclusion
In conclusion, Cheddar & Chive Biscuit Bliss is more than just a recipe; it is an experience that combines simplicity and flavor into a delightful dish that can be enjoyed any time of day. With its straightforward preparation and delicious outcome, this recipe is perfect for both novice and experienced bakers alike. By following the detailed instructions and understanding the role of each ingredient, you can create biscuits that not only taste incredible but also bring joy to your kitchen. Whether served at brunch, as a side, or on their own, these biscuits are sure to become a beloved favorite.
So gather your ingredients, preheat your oven, and get ready to enjoy the warm, cheesy goodness of homemade Cheddar & Chive Biscuits. They promise to be a hit at your next meal! Happy baking!
