
Introduction
The allure of tacos is a culinary phenomenon that transcends borders and cultures. These versatile hand-held delights invite creativity and experimentation, making them a favorite among food enthusiasts worldwide. When you combine the classic taco with the irresistible flavors of crispy garlic shrimp, the result is nothing short of extraordinary. Crispy Garlic Shrimp Tacos are not just a meal; they are an experience that tantalizes the senses and brings a burst of flavor to your table.
In this article, we will take you through the delightful process of creating Crispy Garlic Shrimp Tacos that will have your taste buds dancing with joy. With the perfect crunch from panko breadcrumbs and a bold garlic flavor complemented by vibrant toppings, this recipe is designed to impress both family and friends. Not only will you learn about the essential ingredients that make this dish shine, but we will also guide you through each preparation step to ensure your shrimp tacos are a resounding success.
Understanding the Ingredients
The Role of Shrimp in Tacos
At the heart of these tacos is the shrimp, and choosing the right type is crucial for achieving the desired texture and flavor. Large shrimp, ideally 16-20 count per pound, are often the best choice for this recipe. Their size means they hold up well during cooking, ensuring a satisfying bite. Additionally, larger shrimp have a more pronounced flavor and a firm texture that provides a delightful contrast to the crispy coating.
When selecting shrimp, consider opting for wild-caught varieties if possible. They often have a sweeter, more robust flavor compared to farmed shrimp, which can be more bland. Always look for shrimp that are firm to the touch, with a clean, fresh smell. This ensures that you are using the best quality shrimp for your tacos.
The Importance of Breadcrumbs
Achieving the perfect crunch in your Crispy Garlic Shrimp Tacos relies heavily on the type of breadcrumbs you choose. While regular breadcrumbs can certainly work, panko breadcrumbs are preferred for their unique texture and lightness. Originating from Japan, panko is coarsely ground and results in a crispier coating due to its larger flakes and airy structure.
When the shrimp are coated in panko and fried, they develop an irresistible golden-brown crust that adds both flavor and texture to the dish. The lightness of panko allows the shrimp’s natural flavor to shine through, while still providing that satisfying crunch we all crave in a taco.
Garlic: The Flavor Booster
Garlic is the unsung hero of this recipe, delivering a bold and aromatic flavor that elevates the shrimp to new heights. Not only does it add depth to the dish, but garlic is also celebrated for its numerous health benefits. It contains antioxidants and compounds that may boost the immune system and promote heart health.
In this recipe, minced garlic is incorporated into the marinade, infusing the shrimp with its robust flavor. When cooked, garlic develops a sweet and savory profile that complements the shrimp perfectly. Whether you prefer a milder taste or a more intense garlic punch, you can adjust the amount of garlic to suit your palate.
Spices that Make a Difference
To enhance the flavor of your Crispy Garlic Shrimp Tacos, we turn to a few key spices: smoked paprika and cayenne pepper. Smoked paprika adds a rich, smoky flavor that deepens the overall taste of the dish, creating a delightful contrast with the shrimp and garlic. Its earthy undertones are essential for adding complexity to the flavor profile.
Cayenne pepper, on the other hand, introduces a subtle heat that balances the richness of the shrimp. A small amount can elevate the dish without overwhelming it, adding a pleasant kick that keeps you reaching for more. When combined, these spices create a harmonious blend that makes these tacos truly unforgettable.
Choosing the Right Tortillas
The choice of tortilla can significantly affect the overall experience of your Crispy Garlic Shrimp Tacos. Corn and flour tortillas are the two most popular options, each offering a distinct flavor and texture.
Corn tortillas are traditional and provide a slightly nutty flavor, complementing the shrimp beautifully. They are also gluten-free, making them a great option for those with dietary restrictions. However, they can be more fragile, so it’s essential to warm them up properly to prevent cracking.
Flour tortillas, on the other hand, are softer and more pliable, making them an excellent choice for holding in the juicy shrimp and toppings. They tend to have a milder flavor, allowing the shrimp to take center stage. When choosing tortillas, consider your preference for texture and flavor, and don’t hesitate to try both types to see which you enjoy more.
Preparation Steps for Success
Marinating the Shrimp
One of the most vital steps in preparing Crispy Garlic Shrimp Tacos is marinating the shrimp. Marination not only infuses the shrimp with flavor but also helps to tenderize the meat, resulting in a juicier bite. For this recipe, a simple marinade consisting of olive oil, garlic, smoked paprika, cayenne pepper, and a pinch of salt is ideal.
To marinate the shrimp, combine all the marinade ingredients in a bowl, then add the shrimp and toss to ensure each piece is well-coated. Cover the bowl and let it sit in the refrigerator for at least 30 minutes; this allows the flavors to meld and penetrate the shrimp deeply. If you have more time, extending the marination to a couple of hours will intensify the flavor even further.
For those looking to switch things up, consider experimenting with alternative marinades. A citrus-based marinade with lime or lemon juice can add a refreshing zing, while a honey-based marinade can introduce a hint of sweetness that contrasts beautifully with the garlic and spices.
Creating a Breading Station
To streamline the cooking process and ensure an efficient workflow, setting up a breading station is highly recommended. A well-organized breading station consists of three shallow dishes: one for the seasoned flour, one for beaten eggs, and one for the panko breadcrumbs.
Start by seasoning flour with salt, pepper, and any additional spices you prefer. The seasoned flour acts as the first layer of flavor, while the egg wash helps the panko adhere to the shrimp. Finally, the panko breadcrumbs will provide the coveted crunch.
To bread the shrimp, first, coat each piece in the seasoned flour, shaking off any excess. Next, dip the shrimp in the egg wash, allowing any extra to drip off before transferring it to the panko dish. Press the shrimp into the breadcrumbs gently to ensure an even coating, then set them aside on a plate. This method not only keeps your work area clean but also makes the frying process much smoother, allowing you to focus on cooking rather than messy hands.
By understanding the ingredients and following these initial preparation steps, you’ll be well on your way to creating mouthwatering Crispy Garlic Shrimp Tacos that will leave your guests raving. The combination of fresh shrimp, crispy breadcrumbs, and flavorful spices offers a delightful twist on a classic favorite, making it a must-try for any taco lover.
{{image_2}}
Perfecting the Frying Technique
Achieving perfectly crispy shrimp is an art that requires attention to detail, especially when it comes to the frying method. First and foremost, the oil temperature plays a crucial role in the texture of the shrimp. For optimal crispiness, heat your oil to around 350°F (175°C). This temperature allows the shrimp to cook quickly, sealing in moisture while creating a golden-brown crust.
Once your oil reaches the desired temperature, carefully add the shrimp in batches. Overcrowding the pan can lower the oil temperature, leading to soggy shrimp instead of the crispy finish you desire. Fry the shrimp for about 2-3 minutes on each side, or until they turn a beautiful golden brown. Use a slotted spoon to transfer the cooked shrimp to a plate lined with paper towels, which will help absorb any excess oil and maintain their crunch.
Warming Tortillas: Why It Matters
Don’t overlook the importance of warming your tortillas before assembling your tacos. This simple step not only enhances the flavor of the tortillas but also prevents them from tearing during assembly, making your tacos easier to manage. There are several effective methods for warming tortillas:
1. Skillet Method: Place a dry skillet over medium heat. Once hot, add one tortilla at a time for about 30 seconds on each side, until warmed and pliable.
2. Oven Method: Preheat your oven to 350°F (175°C). Wrap a stack of tortillas in aluminum foil and place them in the oven for about 10-15 minutes.
3. Microwave Method: Stack a few tortillas on a microwave-safe plate, cover with a damp paper towel, and microwave for about 30 seconds or until warm.
Choosing the right method depends on your preference and the number of tortillas you’re preparing. No matter which technique you use, a warm tortilla provides a soft, inviting base for your delicious shrimp and toppings.
Assembling the Tacos
Building the Base
Start your taco assembly with a generous layer of shredded cabbage. This adds a delightful crunch and acts as a sturdy foundation that holds the shrimp in place. You can use green cabbage, red cabbage, or a mix of both for added color and texture. Aim for about a quarter to a half cup of cabbage per taco, depending on your personal preference.
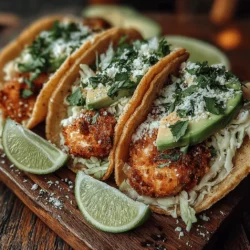
The Star of the Show: Adding the Shrimp
Now it’s time to crown your tacos with the crispy garlic shrimp. Carefully place about 4-5 shrimp on top of the cabbage in each tortilla, ensuring they are evenly distributed. This not only enhances the visual appeal of your dish but also ensures that every bite is packed with flavor.
Finishing Touches
No taco is complete without a few finishing touches! Consider adding a dollop of sour cream or Greek yogurt for creaminess that balances the savory shrimp. These toppings add a cool contrast to the heat of the garlic and spices.
For an extra burst of freshness, sprinkle chopped fresh cilantro over the top. Cilantro not only adds a vibrant green color but also complements the flavors of the shrimp beautifully. Finally, serve your tacos with lime wedges on the side, allowing everyone to squeeze fresh lime juice over their tacos for an added zing.
Serving Suggestions and Pairings
Ideal Accompaniments
To round out your meal, consider serving your Crispy Garlic Shrimp Tacos with a variety of sides that enhance the overall dining experience. Here are some great options:
– Mexican Street Corn: Grilled corn on the cob slathered in mayo, lime, chili powder, and cheese makes for a flavorful side.
– Black Beans or Refried Beans: These protein-packed sides pair wonderfully and offer a hearty component to your meal.
– Spanish Rice or Cilantro Lime Rice: Fluffy rice with a hint of lime complements the flavors of the shrimp tacos beautifully.
– Fresh Salsa or Pico de Gallo: A side of fresh salsa adds a refreshing element, balancing the richness of the shrimp.
Creating a Taco Bar
If you’re hosting a gathering, consider setting up a taco bar! This interactive dining experience allows guests to customize their tacos to their liking. Provide a variety of toppings, such as diced tomatoes, shredded cheese, jalapeños, pickled red onions, and guacamole.
Include bowls of different salsas, from mild to spicy, so everyone can find their perfect match. Not only does a taco bar make for a fun and engaging atmosphere, but it also allows each guest to create their ideal taco masterpiece.
Conclusion
Crispy Garlic Shrimp Tacos offer a delightful fusion of flavors and textures that make them a standout dish for any occasion. With a straightforward preparation process and vibrant ingredients, this recipe is sure to become a favorite in your household. From the initial marination of the shrimp to the final assembly of the tacos, each step is designed to create a memorable meal.
Whether you’re hosting a dinner party or simply enjoying a weeknight meal, these tacos promise satisfaction and enjoyment. Embrace the joy of cooking and the pleasure of sharing delicious food with loved ones through this easy yet impressive recipe. Make sure to gather your ingredients, follow the steps carefully, and enjoy the burst of flavor that each bite brings. Happy cooking!