
Chilly Citrus Bliss: Frozen Key Lime Pie Bars
As the sun shines brightly and temperatures rise, there’s nothing quite like indulging in a refreshing dessert to cool off and satisfy your sweet tooth. Enter the Frozen Key Lime Pie Bars—an irresistible treat that combines the tangy zest of key limes with the creamy sweetness of condensed milk, all nestled in a buttery graham cracker crust. This delightful dessert is not only a feast for the senses but also a nostalgic nod to classic summertime flavors, making it a perfect addition to your warm-weather gatherings.
In recent years, frozen desserts have surged in popularity, largely due to their versatility and the joy they bring during sweltering days. Whether it’s a backyard barbecue, a picnic in the park, or simply a sunny afternoon at home, these Key Lime Pie Bars offer a delightful balance of tart and sweet that is sure to please everyone. The creamy filling, combined with the crunchy crust, creates a perfect harmony that tantalizes the taste buds while providing a refreshing escape from the heat.
Understanding Key Ingredients
To truly appreciate the brilliance of Frozen Key Lime Pie Bars, it’s essential to understand the key ingredients that contribute to this treat’s unique flavor profile. The star of the show is undoubtedly the key lime, a small, round citrus fruit that packs a punch. Key limes are known for their distinctive tartness and fragrant aroma, which elevates the flavor of any dessert. Unlike their more common Persian lime cousins, key limes have a bold, floral notes that lend a refreshing zing to this pie.
The use of Greek yogurt in the filling not only provides a creamy texture but also offers a healthier alternative to traditional recipes that often call for heavy cream or sour cream. Greek yogurt is rich in protein and probiotics, making it a nutritious option that doesn’t compromise on taste. When blended into the filling, it contributes to a luscious consistency that’s both satisfying and refreshing.
The graham cracker crust is another essential component of this dessert. Its sweet, crumbly texture provides the perfect base for the creamy filling. The combination of crushed graham crackers, melted butter, and a touch of sugar creates a classic crust that adds depth to the overall dessert. The graham cracker crumbs not only offer a delightful crunch but also serve as a neutral backdrop that allows the key lime filling to shine.
Lastly, sweetened condensed milk plays a crucial role in achieving the ideal balance of sweetness and creaminess. This thick, syrupy ingredient is made by removing most of the water content from milk and adding sugar, resulting in a rich and velvety consistency. In the context of this recipe, sweetened condensed milk offsets the tartness of the key limes, ensuring each bite is both tart and sweet, with a beautifully creamy texture.
Crafting the Perfect Crust
The foundation of any great dessert begins with its crust, and making the graham cracker crust for the Frozen Key Lime Pie Bars is a straightforward yet essential process. Start by gathering your ingredients: graham cracker crumbs, melted butter, and granulated sugar. These three elements come together to create a crust that will hold up to the creamy filling while providing a delightful crunch.
To prepare the crust, begin by preheating your oven to 350°F (175°C). In a mixing bowl, combine the graham cracker crumbs and granulated sugar. The sugar adds a hint of sweetness that complements the natural flavor of the graham crackers. Once mixed, pour in the melted butter, which binds the crumbs together and creates a rich flavor. Stir until the mixture resembles wet sand, ensuring that all crumbs are evenly coated.
Next, it’s time to transfer the crumb mixture into a baking dish—typically an 8×8 inch or a 9×13 inch pan works well for bars. Using the back of a measuring cup or your fingers, firmly press the crumb mixture into the bottom of the pan, spreading it evenly. This step is crucial for creating a sturdy crust that won’t crumble when cut into bars. Make sure to press down hard enough to compact the crumbs, forming a solid base that will support the filling.
Once the crust is pressed firmly into place, it’s important to bake it for about 10 minutes, just until it turns golden brown. This step not only adds flavor but also helps set the crust, preventing it from becoming soggy once the filling is added. After baking, allow the crust to cool completely at room temperature before chilling it in the refrigerator for at least 30 minutes. Chilling the crust ensures that it firms up, making it easier to cut clean bars later on.
Creating a Creamy Filling
With the crust prepared and chilled, it’s time to move on to the star of the dessert—the creamy key lime filling. Making the filling is simple and requires just a few key ingredients: key lime juice, Greek yogurt, sweetened condensed milk, and lime zest. Each component plays a vital role in achieving the desired flavor and texture.
Start by juicing fresh key limes to obtain about ½ cup of juice. The freshness of the juice is critical, as it provides the signature tartness that defines this dessert. If fresh key limes are unavailable, you can substitute with bottled key lime juice, but fresh juice will yield superior flavor.
In a large mixing bowl, combine the sweetened condensed milk and Greek yogurt. Whisk them together until smooth, ensuring that there are no lumps. The Greek yogurt adds creaminess while balancing the sweetness from the condensed milk. Once combined, add the freshly squeezed key lime juice and lime zest. The zest enhances the flavor, adding a fragrant, aromatic quality that elevates the overall taste of the filling. Gently fold the ingredients together until fully combined, being careful not to overmix.
To achieve a truly smooth and creamy consistency, consider using an electric mixer or a blender. This will help aerate the mixture and eliminate any remaining lumps, resulting in a velvety filling that will spread beautifully over the crust. Once the filling is perfectly blended, pour it over the chilled graham cracker crust. Use a spatula to evenly distribute the filling, smoothing the top for an attractive presentation.
After pouring the filling onto the crust, place the assembled dessert in the freezer. Allow it to freeze for several hours or, ideally, overnight. This freezing process solidifies the filling, creating a delightful texture that’s perfect for slicing into bars.
With the crust and filling prepared, you’re now well on your way to enjoying these Frozen Key Lime Pie Bars. Stay tuned for the next part of the article, which will guide you through the final touches and presentation of this refreshing dessert.
{{image_2}}
The Role of Lime Zest in Enhancing Flavor and Aroma
When it comes to key lime pie, the zest of the lime plays a pivotal role that goes beyond just flavor. Lime zest brings a vibrant aroma that elevates the overall sensory experience of the dessert. The essential oils found in the zest contain a concentrated burst of lime essence, enhancing the refreshing and tangy notes of the filling. This aromatic touch not only complements the tartness but also adds depth to the sweetness of the filling, making each bite a delightful explosion of flavors.
Incorporating lime zest into the filling not only intensifies the citrus flavor but also balances the sweetness, ensuring a harmonious blend that is both refreshing and satisfying. Without this zest, the bars may taste flat or overly sweet, lacking the bright kick that key lime desserts are known for. So, don’t skip this essential step; zesting your limes is crucial for achieving that perfect flavor profile that will leave your guests asking for more.
The Balance Between Tart and Sweet in the Filling
Achieving the perfect balance between tart and sweet in your frozen key lime pie bars is an art. The filling typically combines freshly squeezed key lime juice, sweetened condensed milk, and cream cheese, resulting in a creamy, tangy mixture. The key to striking this balance lies in the proportions of the ingredients.
Key lime juice is naturally tart, and sweetened condensed milk brings in the necessary sweetness. However, it’s essential to taste and adjust as you mix. The ideal filling should be tart enough to awaken the palate while still being sweet enough to satisfy your dessert cravings. If the mixture tastes too tart, consider adding a bit more sweetened condensed milk. Conversely, if it’s too sweet, a splash more lime juice can brighten the filling. This trial-and-error approach ensures that your key lime pie bars will have that refreshing zing that is characteristic of traditional key lime pie.
Freezing to Perfection
Importance of Properly Freezing the Bars for Optimal Texture
Freezing your key lime pie bars correctly is vital to achieving the right texture. If not done properly, the bars can become icy or grainy, which can detract from the smooth, creamy experience that you want. To ensure that your bars freeze to perfection, make sure they are fully set before placing them in the freezer. This may take several hours, depending on the thickness of your bars and the temperature of your freezer.
Suggestions for Covering the Dish to Prevent Freezer Burn
To prevent freezer burn, which can lead to undesirable textures and flavors, it’s essential to cover your dish properly. Use a layer of plastic wrap or aluminum foil to tightly seal the container before placing it in the freezer. Alternatively, you can transfer the bars into an airtight container once they are fully set. This added layer of protection will help maintain the bars’ creamy consistency and prevent any unwanted flavors from getting absorbed.
Recommended Freezing Time and How to Know When the Bars are Ready
For optimal results, freeze your key lime pie bars for at least 4-6 hours, or until they are completely solid. To test if they are ready, gently press the center of the bars with a finger; they should feel firm and not give way. If they still feel soft, allow them to freeze for an additional hour or two. Once fully frozen, the bars can be kept for up to 3 months without losing quality, making them a perfect make-ahead dessert for summer gatherings.
Serving Suggestions and Presentation
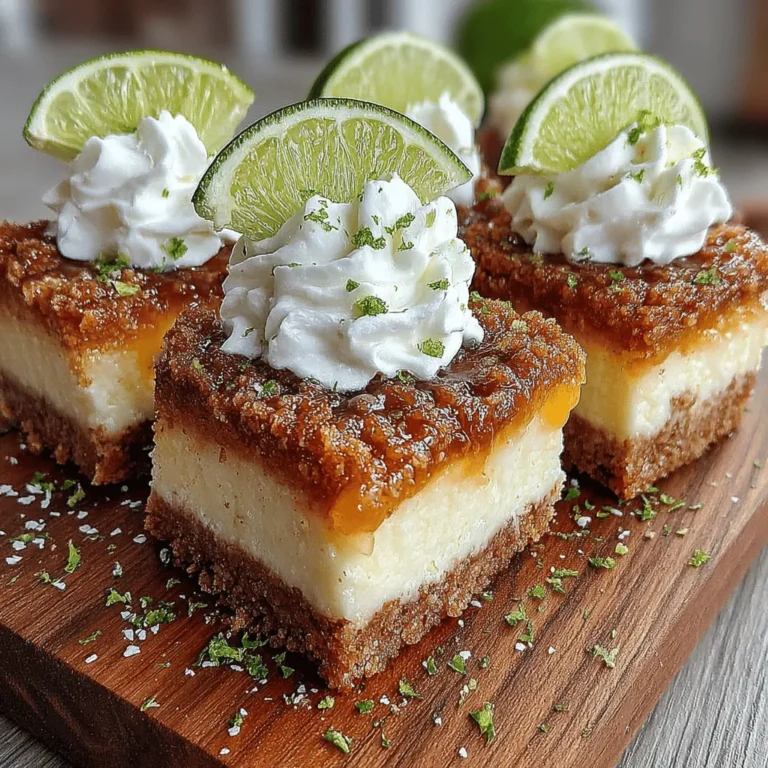
Ideas for Garnishing the Bars with Whipped Cream and Lime Slices
Serving your frozen key lime pie bars can be as delightful as making them. A simple yet elegant way to present these bars is by topping each slice with a dollop of freshly whipped cream. This creamy topping adds a luxurious texture that beautifully contrasts with the tangy filling. For an extra touch of citrus, garnish with thin lime slices or wedges on top. This not only enhances the aesthetic appeal but also serves as a hint to the refreshing flavor that awaits.
Presentation Tips to Make the Dessert Visually Appealing
To make your dessert visually appealing, consider arranging the bars on a colorful platter or cutting board. You can add some decorative touches, such as sprigs of mint or edible flowers, to create a vibrant presentation. A light dusting of graham cracker crumbs around the bars can add a rustic charm and further emphasize the pie-like nature of the dessert. Remember, we eat with our eyes first, so an attractive presentation can elevate your dessert experience!
Serving Options: How to Serve at Parties or Family Gatherings
Frozen key lime pie bars are perfect for parties or family gatherings, as they can be made in advance and served straight from the freezer. If you are hosting a larger event, consider cutting the bars into bite-sized pieces for easy serving. This allows guests to enjoy a refreshing treat without feeling too indulgent. You can create a dessert table featuring a variety of frozen treats, making your key lime pie bars a star attraction. Serve with colorful napkins and ice-cold beverages to enhance the festive atmosphere.
Storage and Shelf Life
Guidance on Storing Leftover Bars in the Freezer
If you find yourself with leftover key lime pie bars, don’t worry! These bars store beautifully in the freezer. After they are fully set, slice them into desired portions and place them in an airtight container, separated by layers of parchment paper to prevent sticking. This will keep them fresh and make it easy to grab a bar whenever the craving strikes.
Information on How Long the Bars Can Be Kept Without Losing Quality
Frozen key lime pie bars can be stored for up to three months without losing their delightful flavor and texture. After this time, they may still be safe to eat, but the freshness and taste may diminish. Labeling your containers with the date will help you keep track of how long they’ve been stored, ensuring you enjoy them at their best.
Tips for Thawing and Serving Frozen Bars
When it’s time to serve your frozen key lime pie bars, thaw them for about 10-15 minutes at room temperature. This allows them to soften slightly, making them easier to cut and enjoy. Alternatively, you can place them in the refrigerator for a couple of hours if you prefer a slower thaw. Avoid microwaving them, as this can lead to uneven texture and temperature.
Conclusion
In summary, making and enjoying Frozen Key Lime Pie Bars is a delightful experience that brings the refreshing taste of citrus right to your home. The process is simple, requiring only a few ingredients and minimal effort, making it an ideal dessert for any occasion. Whether you’re hosting a summer barbecue, a family gathering, or just craving a sweet treat on a hot day, these bars are sure to impress.
With their perfect balance of tart and sweet, along with the vibrant flavor from the lime zest, these bars offer a delightful escape from the ordinary. So, gather your ingredients, follow the steps, and indulge in this refreshing treat that captures the essence of summer in every bite. Enjoy the bliss of these frozen key lime pie bars and make them a staple in your dessert repertoire!
