
Creamy Dreamy No-Bake Peanut Butter Cups: A Delightful Indulgence
In the world of desserts, no-bake recipes hold a special place in the hearts of dessert lovers. Their appeal lies not only in the ease of preparation but also in the ability to create delicious treats without the need for an oven. No-bake desserts are perfect for warm weather, busy days, or whenever you want a sweet treat without the fuss. Among the myriad of no-bake options available, Creamy Dreamy No-Bake Peanut Butter Cups stand out as a fan favorite. This recipe combines the rich, nutty flavor of peanut butter with the indulgence of chocolate, creating a delightful treat that is sure to satisfy your cravings.
These peanut butter cups are incredibly simple to make, requiring just a handful of ingredients and minimal preparation time. With a creamy filling and a decadent chocolate coating, they are a perfect balance of sweet and savory. Whether you are looking for a quick dessert for a gathering, a special treat for yourself, or a healthier alternative to traditional candy, these no-bake peanut butter cups are a fantastic choice. Plus, they can easily be adapted to fit various dietary preferences, making them accessible for everyone.
Dietary Considerations
One of the many advantages of this no-bake recipe is its versatility. For those following a vegan diet, substituting honey with maple syrup makes this dessert completely plant-based. Additionally, using dairy-free chocolate chips allows those with lactose intolerance or dairy allergies to enjoy the rich taste of chocolate without any concerns. This makes Creamy Dreamy No-Bake Peanut Butter Cups a delightful treat for everyone to enjoy, regardless of dietary restrictions.
Understanding the Ingredients
To create the perfect no-bake peanut butter cups, it’s essential to understand the role of each ingredient. The quality of ingredients can significantly impact the flavor and texture of your final product. Here’s a closer look at the key components of this delicious recipe:
Creamy Peanut Butter
The star of the show in this recipe is, of course, creamy peanut butter. When choosing peanut butter, it’s best to opt for natural varieties that contain minimal ingredients—ideally just peanuts and salt. Natural peanut butter provides a rich flavor and smooth texture that is essential for creating a creamy filling. Additionally, it is packed with healthy fats, protein, and essential vitamins and minerals, making it a nutritious choice. The natural oils in peanut butter also lend a velvety mouthfeel that enhances the overall experience of each bite.
Coconut Oil
Coconut oil plays a crucial role in both the texture and flavor of these peanut butter cups. It adds a delightful creaminess and helps the chocolate coating solidify, ensuring that each cup holds its shape. Beyond its functional benefits, coconut oil is known for its health properties, including medium-chain triglycerides (MCTs) that can provide a quick source of energy. Its subtle coconut flavor complements the peanut butter beautifully, adding an extra layer of richness to the dessert.
Honey vs. Maple Syrup
When it comes to sweeteners, both honey and maple syrup can be used in this recipe, but they bring different flavor profiles to the table. Honey adds a distinct sweetness with a floral undertone, while maple syrup contributes a rich, caramel-like flavor. For those adhering to a vegan diet, maple syrup is the preferred choice, as honey is an animal product. Regardless of the sweetener you choose, both options will enhance the overall taste of the peanut butter filling, making it irresistibly delicious.
Dark Chocolate Chips
The chocolate coating is what truly elevates these no-bake peanut butter cups. When selecting chocolate chips, it’s essential to choose high-quality dark chocolate that suits your dietary needs. For those following a vegan lifestyle, dairy-free chocolate chips are widely available and still deliver that rich chocolate flavor. Dark chocolate not only provides a satisfying contrast to the creamy peanut butter but also comes with health benefits, including antioxidants and lower sugar content compared to milk chocolate. Choosing quality chocolate is key to achieving the best flavor profile for your peanut butter cups.
Preparation Steps for Perfect Peanut Butter Cups
Now that you understand the importance of each ingredient, it’s time to dive into the preparation of your Creamy Dreamy No-Bake Peanut Butter Cups. The following steps will guide you through the process, ensuring a smooth and successful experience.
Preparing the Cupcake Liners
The first step in making your no-bake peanut butter cups is to prepare your muffin tin. Line a standard muffin tin with cupcake liners, which will make it easy to remove the cups once they are set. Using liners not only aids in the removal process but also enhances the presentation of your finished treats. Opt for colorful or patterned liners to add an extra touch of fun to your dessert.
Making the Peanut Butter Mixture
With your muffin tin ready, it’s time to create the peanut butter filling. In a mixing bowl, combine your creamy peanut butter, coconut oil, and sweetener of choice. Using a spatula or a mixing spoon, blend the ingredients together until you achieve a smooth and creamy consistency. It’s essential to mix thoroughly to ensure that the coconut oil and sweetener are evenly distributed, creating a uniform filling. The smoothness of the peanut butter mixture is crucial for the overall texture of the final product, so take your time to mix until fully combined.
The significance of each ingredient in the filling cannot be overstated. The creamy peanut butter provides the base flavor, while the coconut oil contributes to the creaminess and helps the filling firm up when chilled. The sweetener balances the richness of the peanut butter, making the filling delectable and satisfying. If you’re looking for a touch of extra flavor, consider adding a pinch of salt or a splash of vanilla extract to enhance the overall taste.
As you prepare to assemble your peanut butter cups, keep in mind that the key to achieving the perfect balance of flavors lies in the quality of your ingredients and the care you take during the mixing process. With your cupcake liners prepared and your peanut butter mixture ready, you’re well on your way to creating a delicious batch of Creamy Dreamy No-Bake Peanut Butter Cups.
Stay tuned for the next part of the article, where we will continue with the assembly and chilling process, ensuring you achieve the ultimate treat that will impress your family and friends.
{{image_2}}
Melting the Chocolate
Melting chocolate is a crucial step in the process of making Creamy Dreamy No-Bake Peanut Butter Cups. The way you melt the chocolate can significantly affect the texture and taste of the final product. There are two popular methods to do this: the microwave method and the double boiler method.
Microwave Method
1. Chop Your Chocolate: Start by chopping your chocolate into small, uniform pieces. This helps it melt evenly.
2. Use a Microwave-Safe Bowl: Place the chopped chocolate in a microwave-safe bowl.
3. Heat in Intervals: Microwave the chocolate in 20-30 second intervals, stirring between each interval. This prevents overheating and ensures that the chocolate melts smoothly. Once about 75% melted, give it a good stir until fully melted.
Double Boiler Method
1. Prepare the Double Boiler: Fill a pot with water and bring it to a simmer. Place a heatproof bowl on top of the pot, ensuring it doesn’t touch the water.
2. Add Chocolate: Place the chopped chocolate in the bowl and stir it occasionally as it melts. The steam from the simmering water will gently heat the bowl, melting the chocolate without the risk of scorching.
3. Remove from Heat: Once melted, remove the bowl from the pot and use the chocolate immediately for assembling your peanut butter cups.
Both methods work well, but the double boiler method is often preferred for its gentle heat, which helps maintain the chocolate’s sheen and texture.
Assembling the Cups
Once your chocolate is melted, it’s time to assemble the cups. This step involves layering, which not only creates a beautiful presentation but also enhances the overall flavor experience.
Layering Technique
1. First Layer: Begin by spooning a small amount of melted chocolate into the bottom of each cupcake liner. Use the back of a spoon to spread it evenly across the bottom.
2. Add Peanut Butter Filling: After the first layer has set slightly (about 10 minutes in the freezer), spoon a generous dollop of the peanut butter mixture on top of the chocolate layer. Press it down gently to ensure it adheres well but don’t flatten it completely.
3. Final Chocolate Layer: Top off the peanut butter layer with more melted chocolate, ensuring that all the peanut butter is covered. This layer seals the peanut butter filling and creates a beautiful top layer.
This layering technique is essential as it allows each bite to have a perfect balance of chocolate and peanut butter, enhancing the taste and texture of your homemade treats.
Chilling Times
Chilling is a crucial part of the process that should not be overlooked. The chilling times ensure that your Creamy Dreamy No-Bake Peanut Butter Cups achieve the right texture and flavor.
1. Initial Freeze: After assembling your cups, place them in the freezer for at least 30 minutes. This will help the chocolate set firmly around the peanut butter filling.
2. Longer Storage: If you plan to store them longer, transfer the cups to the refrigerator after the initial freeze. They can be kept in the fridge for up to a week, allowing flavors to meld and develop further.
Chilling not only solidifies the chocolate but also allows the flavors to deepen, providing a richer taste experience. This step is vital to achieving that perfect creamy texture that makes these peanut butter cups so irresistible.
The Art of Presentation
Presentation plays a significant role in both the enjoyment and appeal of your Creamy Dreamy No-Bake Peanut Butter Cups. Here are some creative serving ideas to elevate your treat’s appearance.
Arranging on a Platter
For gatherings or special occasions, consider arranging your peanut butter cups on a decorative platter. Use colorful cupcake liners to add visual interest, and group them in clusters for an inviting display. This not only makes them more appealing but also encourages everyone to indulge.
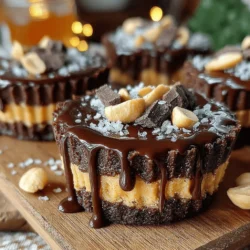
Garnishing Options
To add a touch of flair and flavor, consider garnishing your cups with the following:
– Sea Salt: A sprinkle of flaky sea salt on top of the melted chocolate adds a delightful contrast to the sweetness and enhances the peanut butter flavor.
– Chopped Nuts: Finely chopped peanuts or almonds can be sprinkled on top for added crunch and a gourmet touch.
– Drizzled Chocolate: For an elegant finish, drizzle some melted chocolate over the top of the cups before chilling them. This creates a beautiful pattern and adds more chocolatey goodness.
Tips for Storing Leftovers
To maintain the freshness of your Creamy Dreamy No-Bake Peanut Butter Cups, follow these storage tips:
1. Airtight Container: Store the peanut butter cups in an airtight container to prevent them from absorbing moisture and odors from the fridge.
2. Layering: If stacking them, use parchment paper between layers to prevent sticking.
3. Freezing: For longer storage, these treats can also be frozen. Just make sure to wrap them in plastic wrap before placing them in a freezer-safe container. They can last up to three months in the freezer.
Nutritional Information and Dietary Benefits
Understanding the nutritional profile of your treats can help you enjoy them more mindfully.
Macronutrient Profile
A serving of these Creamy Dreamy No-Bake Peanut Butter Cups typically contains around:
– Calories: 180
– Protein: 6g
– Carbohydrates: 12g
– Fat: 13g
This makes them a satisfying snack that offers a balance of carbohydrates, protein, and healthy fats.
Health Benefits of Peanut Butter
Peanut butter is not only delicious but also packed with health benefits:
– Protein: It provides a good source of protein, essential for muscle repair and growth.
– Healthy Fats: The monounsaturated fats in peanut butter can promote heart health when consumed in moderation.
– Vitamins and Minerals: Peanut butter contains essential vitamins like vitamin E, B vitamins, and minerals such as magnesium and potassium.
Considerations for Dietary Restrictions
This recipe can easily accommodate various dietary needs:
– Gluten-Free: Ensure that all ingredients, especially the chocolate, are labeled gluten-free.
– Dairy-Free: Use dairy-free chocolate and nut butter to make these treats suitable for those with lactose intolerance or dairy allergies.
By being mindful of these dietary considerations, everyone can enjoy the delightful taste of these peanut butter cups.
Conclusion
Making Creamy Dreamy No-Bake Peanut Butter Cups is not only easy but also immensely satisfying. The combination of rich chocolate and creamy peanut butter creates a flavor profile that is hard to resist. Plus, with the convenience of no baking required, you can whip up these treats in no time.
I encourage you to experiment with variations of this recipe. Try adding different toppings such as crushed pretzels for a salty crunch or using almond butter instead of peanut butter for a new twist. The possibilities are endless, and your creativity can shine through.
Homemade treats like these peanut butter cups are perfect for everyday snacks or special occasions. They embody the joy of cooking and the satisfaction of sharing something delicious with loved ones. So gather your ingredients, melt that chocolate, and enjoy the delightful experience of making your own creamy, dreamy peanut butter cups!