
Oreo Delight: No-Bake Ice Cream Pie Recipe
When it comes to desserts that captivate both the eyes and the taste buds, Oreo Delight stands out as a favorite among many. This no-bake ice cream pie combines the beloved flavors of Oreo cookies with creamy ice cream, creating a treat that is as indulgent as it is easy to prepare. Whether you’re hosting a summer barbecue, celebrating a birthday, or simply looking for a sweet family dessert, this pie is the perfect choice to impress your guests and satisfy those cravings.
One of the most appealing aspects of Oreo Delight is its no-bake nature, making it an accessible recipe for bakers of all skill levels. There’s no need to turn on the oven or spend hours in the kitchen; this dessert comes together quickly and easily, allowing you to focus on what really matters—enjoying the company of friends and family. With its delightful combination of flavors and textures, Oreo Delight is sure to become a go-to recipe for any occasion.
Understanding Oreo Delight: A Delectable No-Bake Dessert
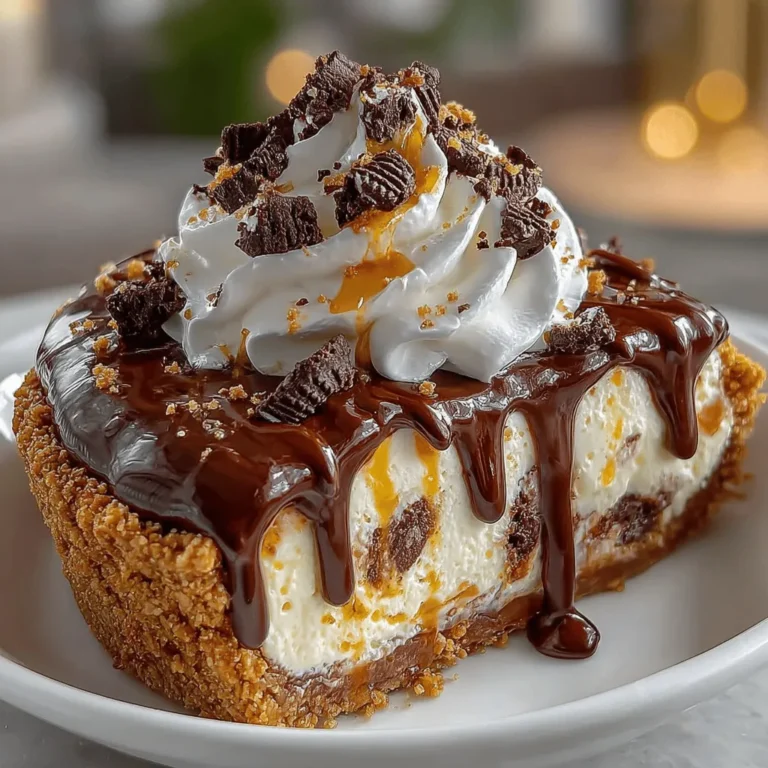
Oreo Delight is a multi-layered dessert that features a crunchy Oreo crust, a luscious ice cream filling, and a rich chocolate fudge topping. The star of the show is, of course, the Oreo cookies that form the base and provide a satisfying crunch. Each bite reveals the creamy ice cream layer, which balances the crispiness of the crust beautifully. The contrast between the smooth, rich filling and the crunchy base is what makes this dessert so irresistible.
What makes Oreo Delight particularly versatile is its adaptability to suit various tastes. While the classic version often utilizes vanilla or cookies and cream ice cream, feel free to experiment with different flavors. Chocolate, mint, or even coffee ice cream can provide a unique twist. Additionally, the topping can be customized with an array of garnishes such as whipped cream, chocolate syrup, or even fresh fruit, allowing you to tailor this dessert to your liking.
Ingredients Breakdown
To create this delightful no-bake ice cream pie, you’ll need a handful of quality ingredients that come together to create a dessert that’s not only delicious but also visually appealing. Here’s a detailed list of what you’ll need:
– Oreo Cookies: The star ingredient for this recipe. The classic chocolate wafer cookies provide the perfect base for the crust.
– Unsalted Butter: This is essential for binding the Oreo crumbs together and creating a stable crust. Using unsalted butter allows you to control the saltiness of the dessert.
– Ice Cream: The filling can be any flavor you desire, but a creamy, high-quality ice cream will yield the best results. Make sure to let it soften slightly before mixing to achieve a smooth texture.
– Heavy Whipping Cream: This will be whipped to create a light and airy topping. The richness of heavy cream adds a luxurious texture that elevates the overall dessert.
– Chocolate Fudge Sauce: For drizzling over the top, adding a delectable layer of richness.
– Optional Garnishes: Crushed Oreos for sprinkling on top or fresh fruit for an added pop of color and flavor can enhance the presentation and taste.
Using high-quality ingredients will significantly impact the taste of your Oreo Delight, so it’s worth investing in the best products you can find.
Step-by-Step Guide to Crafting Oreo Delight
Now that you have your ingredients ready, let’s dive into the preparation of this delicious no-bake ice cream pie. The process is straightforward, and with a few simple steps, you’ll have a stunning dessert ready to chill in the fridge.
Preparing the Crust:
1. Crush the Oreo Cookies: Start by placing the Oreo cookies into a food processor and pulse until they turn into fine crumbs. If you don’t have a food processor, you can place the cookies in a zip-top bag and crush them with a rolling pin. Aim for a texture similar to sand, as this will help form a solid crust.
2. Combine with Butter: Melt the unsalted butter in a microwave-safe bowl. Once melted, combine the Oreo crumbs and butter in a medium-sized mixing bowl. Stir until the crumbs are evenly coated with butter.
3. Pressing the Crust: To create a firm base, pour the crumb mixture into a 9-inch pie dish. Use the back of a measuring cup or your fingers to press the crumbs firmly and evenly along the bottom and up the sides of the dish. Make sure to pack the crumbs tightly to ensure the crust holds its shape when sliced.
4. Chill the Crust: Once the crust is formed, place it in the refrigerator for about 15-20 minutes to allow it to set. This step is crucial, as it helps the crust firm up before adding the ice cream layer.
Making the Ice Cream Filling:
5. Soften the Ice Cream: While the crust is chilling, take your ice cream out of the freezer and let it sit at room temperature for about 10-15 minutes until it softens slightly. This will make it easier to mix and spread.
6. Mix the Ice Cream: In a large mixing bowl, scoop the softened ice cream and use a spatula to stir it until it’s smooth and creamy. If you’re using multiple flavors, you can gently fold them together for a marbled effect.
7. Fill the Crust: Once the ice cream is well mixed, spoon it into the chilled Oreo crust. Use a spatula to spread it evenly, smoothing the top for a polished finish.
At this stage, you can add layers of chocolate fudge sauce if you’d like a more decadent dessert. Simply drizzle the fudge over the ice cream filling and swirl it with a knife for a visually appealing effect.
With these initial steps completed, your Oreo Delight is well on its way to becoming a show-stopping dessert. Stay tuned for the next part, where we’ll dive deeper into the finishing touches and serving suggestions that will make your no-bake ice cream pie truly unforgettable.
{{image_2}}
Importance of Folding in Crushed Oreos Without Overmixing
When it comes to creating the perfect Oreo Delight, the technique you use to incorporate the crushed Oreos into your whipped cream mixture is crucial. Folding is a gentle method that helps retain the air that you’ve whipped into the cream, giving your pie a light and fluffy texture. Overmixing can lead to a dense filling, which diminishes the airy quality that makes this dessert so delightful.
To properly fold in the crushed Oreos, use a spatula to scoop from the bottom of the bowl and gently lift the mixture over itself. Rotate the bowl as you do this to ensure even distribution without losing that precious volume. Aim for a marbled effect where the crushed Oreos are evenly distributed but not completely blended into the cream. This technique will ensure that every bite of your pie retains that delicious Oreo crunch.
Whipping the Cream
Achieving the perfect whipped cream is a key component in this no-bake ice cream pie. Start with cold heavy cream; the colder the cream, the better it will whip. Use a stand mixer or hand beater to whip the cream until it reaches stiff peaks. But what does that mean? Stiff peaks occur when the cream holds its shape and stands upright when you lift the beater out of the bowl. This structure is essential as it not only gives the pie body but also helps it maintain its shape when served.
For added flavor and sweetness, incorporate powdered sugar and vanilla extract as you whip the cream. The powdered sugar dissolves quickly and sweetens the cream without weighing it down. The vanilla extract enhances the overall flavor profile, making each slice of pie a taste sensation.
Assembling the Pie
The assembly of your Oreo Delight is where your dessert starts taking shape. Begin by layering the whipped cream mixture into your prepared pie crust. Use a spatula to spread it evenly, smoothing the top to ensure a beautiful finish. When layering, it’s important to be gentle and avoid deflating the whipped cream. Aim for a flat and even surface, which will not only make the pie visually appealing but will also help in achieving uniform slices when it’s time to serve.
For added creativity, consider decorating the top with more crushed Oreos. Sprinkle them generously to create a textured look that complements the pie’s flavor. You can also use whole Oreos or chocolate shavings for a more sophisticated presentation. Remember, a visually appealing dessert can heighten the anticipation and enjoyment of eating it.
Chilling the Pie
Chilling is a vital step that cannot be overlooked in this recipe. Proper chilling allows the pie to set, ensuring that it holds its shape when cut. It also helps the flavors meld together, enhancing the overall taste of the pie. Ideally, you should chill the pie in the refrigerator for at least four hours, but overnight is even better if you have the time.
If you’re short on time, just make sure to let it chill for a minimum of four hours to achieve the right texture. Before serving, check that the pie is firm and sliceable. If you find it too hard, let it sit at room temperature for about 10 minutes before cutting. This will make slicing easier and help the flavors shine through.
Serving Suggestions and Presentation Ideas
Presentation plays a significant role in the enjoyment of any dessert, and Oreo Delight is no exception. When serving, consider using a clean, sharp knife to cut neat slices. For an extra touch, you can plate each slice on a dessert plate with a dollop of whipped cream on the side. Adding a sprinkle of crushed Oreos or a drizzle of chocolate fudge sauce on top elevates the visual appeal and adds an extra layer of flavor.
Pair your Oreo Delight with a glass of cold milk or a scoop of vanilla ice cream for a classic combination. Alternatively, consider serving it alongside a rich coffee beverage, like a mocha or cappuccino, which contrasts beautifully with the sweetness of the pie.
Don’t forget the power of garnishing! A generous drizzle of chocolate fudge sauce and a few crushed Oreos on top can transform your dessert from simple to stunning. This not only enhances the flavor but also adds texture and visual interest.
Nutritional Information
Understanding the nutritional profile of your dessert is always beneficial, especially if you’re keeping an eye on your dietary needs. Each serving of Oreo Delight is approximately 300 calories, depending on the specific ingredients and portion sizes. This indulgent pie is a treat best enjoyed in moderation, particularly for those who are mindful of their caloric intake.
For those with dietary restrictions, note that many brands offer gluten-free Oreo cookies. Substituting these in your recipe can make this delicious dessert accessible to those avoiding gluten, so everyone can enjoy the delightful experience of Oreo Delight.
Conclusion
Creating Oreo Delight: No-Bake Ice Cream Pie is not just about following a recipe; it’s about the joy of making something delicious that brings smiles to your friends and family. This dessert encapsulates the essence of indulgence and simplicity, making it a perfect addition to any gathering or a sweet treat for a quiet evening at home.
We encourage you to try this recipe and share your variations or experiences in the comments. Whether you add your twist or stick to the classic, every version of this pie is bound to create delightful memories. Enjoy the process of making this dessert, and watch as it becomes a staple on your dessert table, bringing joy to all who taste it.
